If you have a small garden and want to reduce your reliance on municipal water or your well, setting up a simple rainwater harvesting system is one of the most practical steps you can take. This guide is for beginners who want to capture free water from their roof using a straightforward setup: gutters, a diverter, and a storage barrel. You don't need specialized skills or expensive equipment - just a weekend, a few basic components, and a willingness to work with what your property already offers.
Rainwater harvesting lets you collect runoff during storms and use it to water plants, fill watering cans, or irrigate raised beds when conditions are dry. Instead of watching that water disappear down the drain or into the lawn, you store it for later. The system we'll walk through is sized for a small garden - typically one or two 50- to 60-gallon barrels - and designed to integrate with existing downspouts. No pumps, no complex filtration, and no permanent alterations to your home's drainage.
By the end of this guide, you'll know where to place your barrel, how to connect a diverter so overflow is managed safely, and what routine maintenance keeps the system clean and functional season after season. The result is a reliable reserve of soft water that's naturally free of chlorine and ideal for most garden plants.
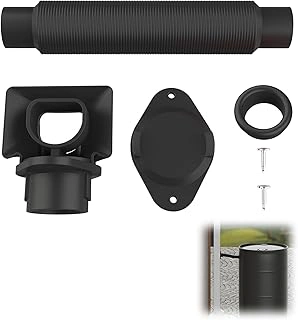
Rain Barrel Downspout Diverter Kit for Rectangular Downspouts
If your home has rectangular downspouts, a diverter kit offers a straightforward way to redirect rainwater into your barrel without cutting or permanently altering your gutter system. This Rain Barrel Downspout Diverter Kit is designed specifically for rectangular profiles and carries a 4.9/5 rating, reflecting solid user satisfaction at an accessible $29.99 price point.
A diverter works by intercepting water as it flows down the downspout and channeling it through a hose into your rain barrel. When the barrel reaches capacity, the diverter automatically stops the flow and allows overflow to continue down the original downspout path, preventing spills around your foundation. This automatic shutoff is especially useful if you're away or forget to monitor water levels during heavy rain.
Installation typically involves attaching the diverter body to the downspout at barrel height, connecting a short length of hose from the diverter outlet to your barrel's inlet, and ensuring a secure seal at each connection point. Because the kit is sized for standard rectangular downspouts, fitment is generally predictable, though you should confirm your downspout dimensions before purchasing. The design keeps modifications minimal, which is helpful if you rent or want the flexibility to remove the system later.
This diverter suits gardeners who want a simple, low-commitment entry into rainwater harvesting without specialized tools or plumbing knowledge. If you have rectangular downspouts and want a straightforward install that includes automatic overflow protection, this kit offers a practical starting point for your small garden system.
- ✅ Affordable at $29.99
- ✅ 4.9/5 user rating
- ✅ Automatic shutoff when barrel is full
- ✅ Designed for standard rectangular downspouts
- ✅ Minimal modification to existing gutters
- ⚠️ Only fits rectangular downspout profiles
- ⚠️ Requires confirming downspout dimensions before purchase
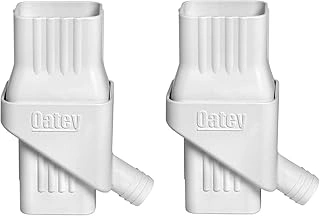
Oatey Mystic Rainwater Collection System for 2x3 Downspouts (2-Pack)
The Oatey Mystic Rainwater Collection System is designed specifically for 2x3 downspouts and arrives as a two-pack, making it a practical choice if you're managing multiple downspouts or planning to fill two separate barrels. Rated 4.3 out of 5, this system is built for straightforward installation - each diverter connects directly to your existing downspout and directs water into your collection barrel. The dual-pack format means you can either set up collection points on opposite sides of a structure or double your harvesting capacity from a single roof area. At $63.24 for both units, the price reflects the convenience of having matched components ready to deploy, though it sits higher than single-diverter options. The system works well for gardeners who want consistent flow management across their property without needing to source and match parts separately.
If you have multiple downspouts around your garden shed or home, or if you're setting up a paired-barrel configuration to increase storage, this two-pack delivers matched performance and simplifies the setup process. It's a solid fit for those expanding beyond a single collection point.
- ✅ Two-pack format covers multiple downspouts or dual-barrel setups
- ✅ Designed specifically for 2x3 downspout compatibility
- ✅ Straightforward installation process
- ✅ Matched components eliminate the need to source parts separately
- ⚠️ Higher upfront cost compared to single diverter units
- ⚠️ Only compatible with 2x3 downspout dimensions
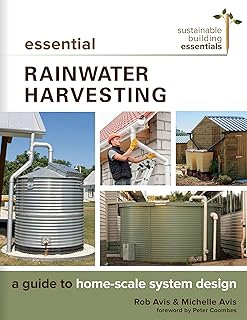
Essential Rainwater Harvesting: A Guide to Home-Scale System Design
If you're interested in understanding the theory and design principles behind rainwater harvesting, Essential Rainwater Harvesting: A Guide to Home-Scale System Design offers a structured approach to sizing, planning, and optimizing systems beyond a single barrel. With a 4.6/5 rating and priced at $22.44, this book walks through the fundamentals of catchment area calculation, storage capacity planning, and distribution strategies that apply whether you're starting small or planning to expand.
The guide covers practical considerations like evaluating your roof surface, estimating seasonal rainfall patterns, and choosing components that fit your property and budget. It's written for homeowners who want to make informed decisions about system layout, filtration options, and integration with existing landscaping rather than following a one-size-fits-all template.
This resource is most useful if you're thinking about adding a second barrel, connecting multiple downspouts, or designing a system that can supply water to raised beds or a greenhouse. It provides the background to troubleshoot common issues like overflow management and freeze protection, and explains the tradeoffs between gravity-fed and pump-assisted setups. For someone working with a single rain barrel and a modest garden, the core techniques in this article will get you started - but if you want confidence in scaling up or customizing your approach, this book offers a deeper foundation in system design.
- ✅ Covers sizing and design principles for expandable systems
- ✅ Explains catchment calculation and storage planning
- ✅ Addresses real-world challenges like overflow and freeze protection
- ✅ Affordable at $22.44 with strong 4.6/5 rating
- ⚠️ More detail than needed for a single-barrel setup
- ⚠️ Requires reading time to extract actionable steps

Harvesting Rainwater for Your Home: Design, Install, and Maintain a Water Collection System
Readers looking for ongoing support beyond the initial setup will find practical value in Harvesting Rainwater for Your Home: Design, Install, and Maintain a Water Collection System. This book covers installation steps alongside maintenance routines and troubleshooting guidance, making it a useful companion for gardeners who want to keep their system running smoothly season after season.
With a 4.4 out of 5 rating and priced at $14.88, the guide walks through design considerations, component selection, and seasonal care tasks in straightforward language. It addresses common questions about filter cleaning, overflow management, and winter preparation - topics that often arise after the barrel is in place and the first rains have passed.
The book's focus on maintenance sets it apart from shorter online tutorials. Rather than stopping at assembly instructions, it explains how to inspect seals, clear debris from filters, and monitor water quality over time. For gardeners managing a small system with one or two barrels, this level of detail helps prevent problems before they interrupt water availability during dry stretches.
If you're comfortable with your setup but want a reference for routine checks and troubleshooting, this resource offers step-by-step guidance without requiring prior plumbing experience. It translates technical concepts into actionable tasks, making it accessible for beginners while remaining thorough enough to answer intermediate questions about system adjustments and seasonal best practices.
- ✅ Covers installation, maintenance, and troubleshooting in one reference
- ✅ Budget-friendly at $14.88
- ✅ Addresses seasonal care and long-term system management
- ✅ Written in accessible language for beginners
- ⚠️ Physical book format may be less convenient for quick field reference
- ⚠️ Focuses on general principles rather than brand-specific components
Who This Is For
This guide is designed for small garden owners who want to capture free rainwater and use it during dry spells or to cut down on municipal water bills. If you have a house or shed with gutters and a modest outdoor space - even just a patio garden or a few raised beds - you can benefit from a basic rainwater harvesting setup. Renters with landlord permission and homeowners alike will find these systems accessible, since most require no permanent plumbing changes or specialized tools.
You don't need prior experience with irrigation or construction. The components connect with simple clamps, and the barrels sit on stable ground or a platform you can build in an afternoon. This approach works especially well if you face occasional watering restrictions, want to reduce reliance on treated tap water for plants, or simply prefer a more self-sufficient garden routine.
Beginners will appreciate that mistakes are low-cost and easy to reverse: a misaligned diverter can be repositioned, and an overflow hose can be extended without cutting into existing drainage. If you're comfortable using a drill, a level, and basic hand tools, you have everything you need to get started.
What You'll Need
Setting up a rainwater harvesting system requires just a handful of core components, all of which are widely available at home improvement stores or online. The centerpiece is a rain barrel, typically in the 50- to 80-gallon range, which collects and stores water from your roof. A downspout diverter kit connects your existing gutter downspout to the barrel, channeling water in while allowing overflow to continue down the drain during heavy rain. You'll also need an overflow hose to direct excess water away from your foundation when the barrel fills, and a mesh screen or tight-fitting lid to keep out debris, mosquitoes, and animals.
A stable base or stand - whether cinder blocks, a wooden platform, or a purpose-built barrel stand - is essential for two reasons: it elevates the spigot so you can fit a watering can underneath, and it provides gravity pressure to improve flow. Look for a stand that raises the barrel at least 12 to 18 inches off the ground. Some barrels come with a spigot pre-installed; if yours doesn't, you'll need a spigot fitting that matches the barrel's outlet. Most beginner systems can be assembled and operational in a single afternoon with basic hand tools - no plumbing experience required.
Keep your component list simple to start: one barrel, one diverter, one overflow solution, and one secure base. You can always expand to multiple barrels linked in series later, but a single-barrel setup is enough to demonstrate the water savings and give you hands-on experience with maintenance and seasonal adjustments.
How to Install Your Diverter and Barrel
Installing the diverter and barrel requires careful placement and a few basic measurements to ensure reliable water flow. Start by choosing a downspout close to your garden - ideally within hose-reach of your beds - and positioned where a full barrel won't block pathways or settle on uneven ground. Measure the height at which your diverter will sit, typically three to four feet above ground level, to allow clearance for the barrel spigot and enough drop for the flexible hose connection.
Mark the downspout at the measured point, then use a hacksaw or reciprocating saw to make a clean, straight cut. Most diverters slide or clamp onto the existing downspout sections, so check the manufacturer's instructions for exact fit and fastener type. Insert the diverter body into the gap, ensuring the outlet port faces your barrel location, and secure it with the provided screws or clamps. Tighten each fastener evenly to prevent leaks and keep the diverter aligned with the downspout flow.
Position your barrel on a stable, level base - cinder blocks, a wooden platform, or paving stones work well - to distribute weight and prevent tipping when full. Elevating the barrel six to twelve inches also improves gravity-fed pressure at the spigot, making watering easier without a pump. Attach the flexible hose from the diverter outlet to the barrel inlet, using hose clamps if needed to prevent disconnection during heavy rain. Double-check that the overflow port on the barrel is open and directed away from your foundation, so excess water drains safely once the barrel reaches capacity.
Run water through the system briefly to confirm all connections are sealed and the diverter routes flow correctly into the barrel. Adjust the barrel position if pooling occurs, and verify the base remains level under load. This careful setup ensures your rainwater harvesting system captures efficiently and stays secure through seasonal weather changes.
Managing Overflow and Keeping Water Clean
A functional overflow system prevents water damage and keeps your rainwater barrel working safely during heavy storms. Every barrel needs a way to release excess water once it reaches capacity, so attach a hose or rigid pipe to the overflow outlet and direct it at least six feet away from your house foundation to avoid pooling or structural issues. Aim the overflow toward a garden bed, gravel drain, or permeable area where the extra water can soak in naturally rather than creating runoff problems.
Debris screens installed at the barrel inlet and downspout diverter stop leaves, twigs, insects, and other contaminants from entering your stored water. These simple mesh or foam filters dramatically reduce the amount of organic matter that settles at the bottom of the barrel, which improves water quality and reduces the frequency of deep cleaning. Check and rinse these screens every few weeks during the growing season, and remove any visible debris after windy days or storms when more material tends to collect.
Plan to clean the inside of your barrel at least once or twice a year, depending on how much sediment builds up and how often you use the water. Empty the barrel completely, scrub the interior walls with a stiff brush and a diluted vinegar solution to remove algae or biofilm, then rinse thoroughly before refilling. This routine maintenance keeps your water cleaner, prevents clogs in spigots or hoses, and extends the lifespan of your entire harvesting system.
How Much Water Can You Collect?
Every inch of rainfall on 1,000 square feet of roof yields roughly 600 gallons of water, which means even a modest roof can capture more than you might expect. A small garden shed or detached garage with a 200-square-foot footprint will collect approximately 120 gallons per inch of rain - enough to fill two 50-gallon barrels from a single storm. This calculation gives you a baseline for planning barrel capacity and understanding how quickly your system can fill during typical spring or summer weather.
For a small garden, a single inch of rain often provides several weeks' worth of watering, especially if you're irrigating containers, raised beds, or a modest vegetable plot. Even in drier climates, a few moderate storms can keep barrels topped off through short dry spells. The key is matching your barrel size to both your roof's collection area and your garden's weekly water needs - most gardeners find that one 50-gallon barrel per 100 to 200 square feet of roof strikes a practical balance.
Keep in mind that collection potential varies with roof material and pitch; smooth metal or asphalt shingles shed water efficiently, while textured surfaces may retain a small percentage. Expect to lose a gallon or two per inch to evaporation, absorption, and overflow during heavy downpours, but those losses rarely impact usefulness for garden irrigation. Setting realistic expectations from the start helps you size your system appropriately and avoid over-investing in barrels you won't fill or under-building capacity that leaves you short during peak growing season.
Common Mistakes to Avoid
Placing your barrel on uneven or unstable ground is one of the most common setup errors - a full 55-gallon barrel weighs over 450 pounds and can shift, tip, or crack if the base settles unevenly. Before installation, level the site with compacted gravel or use concrete pavers to create a solid, flat platform. Check level with a bubble tool and ensure the surface drains away from the foundation.
Forgetting to route overflow is another frequent mistake that leads to flooding around your foundation or erosion near plantings. Every rain barrel needs a dedicated overflow hose or pipe that directs excess water at least six feet away from the house and garden beds. Attach a length of garden hose or flexible downspout extension to the overflow outlet and position the end on a slope or toward a rain garden.
Skipping debris screens at the diverter or barrel inlet allows leaves, twigs, and insects to clog your spigot and contaminate stored water. Install fine mesh screen (1/16-inch or smaller) over the inlet opening and check it monthly during heavy leaf-drop seasons. A simple fix: cut a circle of window screen and secure it with a hose clamp or the barrel lid.
Using a barrel without a functional spigot - or mounting the spigot too low - makes it nearly impossible to fill watering cans or attach hoses efficiently. Position the spigot at least four inches from the bottom so a standard watering can fits underneath, and ensure the valve opens and closes smoothly before the first rain. If your barrel lacks a spigot, drill a hole near the base and install a threaded brass or plastic spigot with rubber washers on both sides to prevent leaks.
Ignoring winter freeze precautions can crack your barrel and damage the diverter if water expands as it freezes. Before the first hard freeze, drain the barrel completely, disconnect the diverter, and either store the barrel indoors or tip it upside down to prevent ice buildup. In mild climates, leave the spigot open and the lid slightly ajar to allow expansion room. Taking these steps in fall protects your investment and ensures your system is ready to go when spring rains return.
Final Takeaway
A simple rainwater harvesting system is one of the most affordable and beginner-friendly upgrades you can make to a small garden. With a single barrel, a basic diverter, and an afternoon of setup, you can start collecting free water that reduces your utility costs and supports healthier, more resilient plants. Most homeowners find the system pays for itself within one or two growing seasons, especially in areas with summer watering restrictions or higher municipal rates.
If you're new to rainwater collection, start small. One 50- to 60-gallon barrel connected to a downspout near your garden beds will teach you how the system works, how quickly it fills, and how much water your garden actually uses. Once you're comfortable with the basics - overflow management, mosquito prevention, and seasonal draining - you can add a second barrel, link multiple containers, or upgrade to a larger cistern. The modular nature of these systems means you're never locked into a single configuration.
Before you scale up or invest in permanent plumbing, check your local regulations. Most municipalities allow small-scale rainwater collection for garden irrigation without a permit, but a few states and counties have volume limits, required backflow devices, or notification rules if you're storing more than a few hundred gallons. A quick call to your water utility or building department will clarify what's allowed in your area and whether any simple steps - like adding a screen or labeling your barrel - are required for compliance.
The real value of a rainwater system isn't just the water you collect; it's the flexibility and peace of mind it provides. During dry spells, you have a backup supply that doesn't depend on hose bans or pressure schedules. During heavy rains, you capture runoff that would otherwise erode soil or overwhelm storm drains. And because rainwater is naturally soft and free of chlorine or salts, many gardeners notice that their plants respond more vigorously than they do to treated tap water. Set up your first barrel this weekend, and you'll wonder why you waited.
Pre-Installation Checklist
- Confirm your downspout size (rectangular or 2×3)
- Choose a barrel location close to your garden and on level ground
- Check that the barrel has a spigot or drainage port
- Install a screen or mesh lid to keep debris and mosquitoes out
- Plan overflow routing away from your foundation
- Ensure the barrel sits on a stable platform or blocks