If you're growing vegetables in raised beds, you've probably spent more time than you'd like dragging hoses and standing with a watering wand. A drip irrigation system solves that problem by delivering water directly to the roots - slowly, steadily, and right where your plants need it most.
This guide is for beginners who want a straightforward way to water raised beds without waste. Drip irrigation uses less water than overhead watering because it minimizes evaporation and runoff. It also keeps foliage dry, which reduces the risk of fungal issues and helps plants stay healthier throughout the growing season.
Setting up a drip system might sound technical, but the process is surprisingly manageable. Most kits come with the tubing, emitters, connectors, and stakes you need to get started. You'll spend a weekend on installation, then enjoy weeks of hands-off watering. Whether you have two beds or ten, the steps are the same: plan your layout, connect to a water source, lay the tubing, and adjust flow as your plants grow.
In the sections that follow, you'll learn how to choose the right components, map your beds for efficient coverage, install the system step-by-step, and troubleshoot common issues. By the end, you'll have a working drip setup that saves you time and keeps your garden consistently moist - even during the busiest weeks of summer.
Who This Guide Is For
This guide is written for homesteaders who maintain one or more raised garden beds and are looking for a more efficient way to keep plants watered. If you currently hand-water with a hose or watering can several times a week - or struggle with uneven moisture where some plants wilt while others stay soggy - drip irrigation can give you more control and consistency.
It's especially useful if you have limited time during the growing season, want to reduce water waste, or simply prefer a system that runs on a timer so you don't have to be present every day. Many people also turn to drip irrigation when they travel, work long hours, or manage multiple beds that make hand-watering tedious.
If you're new to irrigation or feel uncertain about terms like emitters, pressure regulators, or mainline tubing, this guide walks through each component in plain language. You don't need prior plumbing experience or special tools - most drip kits are designed to snap or thread together by hand. The goal is to make setup approachable, even if you've never worked with irrigation before.
Whether you grow vegetables, herbs, or flowers, and whether your beds are 4 feet or 40 feet long, the principles and steps remain the same. This guide focuses on gravity-fed and low-pressure systems that work well in a backyard or homestead setting, without requiring permanent modifications to your home's plumbing.
What Matters Most When Setting Up Drip Irrigation
Setting up a drip irrigation system starts with understanding a few core factors that shape how well the system works in your raised beds. Getting these basics right makes installation simpler and helps the system deliver water exactly where your plants need it.
Tubing length and bed size: Measure the perimeter and interior rows of your beds before buying tubing. Most kits include 50 to 100 feet of main line, which works for a few standard 4×8 beds. If your beds are longer or you plan to run lines through multiple beds, confirm the kit provides enough tubing or plan to buy extra. Undersized tubing means added fittings and potential weak points.
Emitter spacing and plant density: Emitters control where water drips into the soil. Fixed spacing (often 6, 12, or 18 inches apart) works well for evenly spaced rows of vegetables. Adjustable or blank tubing with individual emitters lets you place drips exactly where each plant sits, useful for irregular spacing or container arrangements on top of beds. Match emitter layout to how you plant - tight spacing for greens, wider gaps for tomatoes or squash.
Flow rate: adjustable vs. fixed: Fixed-rate emitters deliver a set amount per hour, typically 0.5 to 2 gallons. They simplify planning but require you to group plants with similar water needs on the same line. Adjustable emitters let you dial flow up or down at each point, adding flexibility but also more setup decisions. For beginners, fixed rates paired with separate zones for heavy and light feeders offer a good balance.
Connection type: Most systems connect to a standard outdoor faucet or hose bib using a threaded adapter. Check whether the kit includes a backflow preventer if your local code requires one. Adding a battery-powered timer at the faucet automates watering schedules and prevents overwatering when you're away. Timers with two outlets let you run different zones on different schedules from a single tap.
Ease of installation: Look for kits with color-coded fittings, pre-attached emitters, or clear instructions. Push-fit connectors (barbed or compression style) require no tools and make changes easy as your garden evolves. Avoid systems that rely heavily on glue or clamps unless you're confident in permanent placement.
Durability and UV resistance: Tubing and fittings sit exposed to sun, heat, and cold. UV-resistant polyethylene tubing lasts multiple seasons without cracking. Cheap vinyl tubing can become brittle within a year. Brass or stainless fittings at the faucet connection outlast plastic and resist cross-threading.
Expandability: If you plan to add beds or extend rows, choose a system with modular components - tees, elbows, and couplers that let you branch off the main line without replacing everything. Some kits include extra fittings; others require separate purchases. Starting with a slightly larger pressure regulator and filter than you need now leaves room to grow the system later.
Tools and Materials You'll Need
- Drip irrigation kit with tubing, emitters, and faucet adapter
- Garden scissors or tubing cutter
- Measuring tape or ruler
- Garden stakes or clips to hold tubing in place
- Optional: hose timer for automatic watering
Step 1: Plan Your Layout and Measure Your Beds
Before you buy parts or start assembling anything, take a few minutes to measure your raised beds and sketch a simple layout. This step ensures you purchase the right amount of tubing and gives you a clear installation roadmap.
Start by measuring the length and width of each bed. If you have multiple beds, measure them all and note whether they're connected in a line or scattered across your garden. Write down the dimensions - these numbers will help you calculate how much main supply tubing you'll need to run along or between the beds.
Next, look at your planting layout. Count the number of rows you plan to plant, or estimate the spacing between plants if you're already growing. Most drip systems use one emitter line per row, or individual emitters placed near each plant. For example, a 4-foot-wide bed with three rows of tomatoes would typically need three parallel drip lines running the length of the bed.
Sketch your layout on paper or use a simple diagram. Mark where your water source is located, then draw lines showing how the main tubing will reach each bed and where the drip lines or emitters will sit inside the beds. This doesn't need to be precise - just enough to visualize the path and count up the linear feet of tubing required.
To calculate tubing length, add up the distance from your water source to the farthest bed, plus the length of drip line needed inside each bed. Include a few extra feet for corners, connections, and any adjustments you might make during installation. It's better to have a little extra than to come up short halfway through.
Count how many emitters or drip line outlets you'll need based on plant spacing. If you're using emitter tubing with pre-spaced outlets, check the spacing interval (commonly 6, 12, or 18 inches) and match it to your plant arrangement. For individual drip emitters on blank tubing, plan one emitter per plant or every 12 inches for densely planted rows.
Remember, this is a working plan, not a blueprint. You can adjust emitter placement, add a tee fitting, or reroute a line as you install. The goal is to avoid surprises and make sure you have all the parts on hand when you're ready to build.
Step 2: Connect the System to Your Water Source
Once you have your kit unpacked and your tubing cut to length, the next step is connecting everything to your outdoor water source. This is usually the most straightforward part of the installation, but taking a few extra minutes to check your connections now will save frustration later.
Start by threading the faucet adapter - often called a hose timer or backflow preventer depending on your kit - onto your outdoor spigot. Hand-tighten it firmly, but don't force it with pliers; most adapters have rubber gaskets that create a good seal without needing metal-on-metal pressure. If your kit includes a filter or pressure regulator, attach those components in the order shown in your instructions, typically filter first, then regulator.
Next, connect the main supply line or header hose to the adapter. Push-fit connectors usually click into place; compression fittings may require a quarter turn and gentle tug to confirm they're seated. If you're splitting water to multiple beds, attach your manifold or Y-connector at this stage, then run separate lines to each bed.
Before you lay out the rest of your tubing, turn the water on slowly and watch each connection for drips or spray. It's much easier to tighten a loose fitting now than after you've buried tubing under mulch or staked everything down. Let the water run for about thirty seconds to flush any debris from the line, then turn it off and move to the next bed if you're installing more than one system.
Pressure is an important consideration, especially if you're running long distances or watering several beds from one source. Most drip kits are designed for typical residential water pressure - around 40 to 60 psi - but if your pressure is higher, a regulator will prevent emitters from popping off or misting instead of dripping. If you notice weak flow at the far end of a long run, you may need to shorten the circuit or split it into two separate lines fed from a manifold closer to the source.
Once you've confirmed there are no leaks at the source and water is flowing cleanly into your main line, you're ready to route tubing through your beds and start placing emitters.
Step 3: Lay the Main Tubing Along Your Beds
Once your timer and backflow preventer are in place, it's time to lay the main tubing that will carry water to your raised beds. Start by unrolling the tubing and laying it out along the route you planned - either around the perimeter of each bed or down the center rows between beds. The tubing will be stiff at first, especially in cooler weather, so let it sit in the sun for a few minutes to become more flexible and easier to work with.
Position the tubing so it reaches each bed you want to irrigate. If you're watering multiple beds, you'll need to branch off the main line using tees and elbows. Insert a tee connector where you want to split the line toward another bed, and use elbow fittings to make 90-degree turns around corners or bed edges. Push the tubing firmly onto each fitting until it seats completely - most fittings are barbed and create a snug, watertight connection without tools.
As you lay the tubing, keep it close to the soil surface or along the edge of the bed where it won't be disturbed by foot traffic or tools. Use tubing stakes or landscape staples every few feet to hold the line in place and prevent it from shifting when water pressure builds or when you're working in the garden. Clips or stakes are especially helpful on sloped sites or where tubing crosses pathways.
Don't worry about getting the layout perfect on the first try. Drip tubing is forgiving - you can reposition it, add or remove fittings, and adjust the route as your garden evolves. If you realize a bed needs water routed differently, simply pull up the stakes, move the tubing, and secure it again. This flexibility makes drip irrigation easy to adapt season after season.
Step 4: Insert and Adjust Emitters
Once your drip tubing is laid out along each raised bed, the next step is to install emitters at the locations where your plants will receive water. Emitters are small devices that deliver a controlled flow of water directly to the root zone, and most drip kits include a hole-punch tool to create insertion points in the tubing.
To insert an emitter, use the punch tool to make a small, clean hole in the tubing at the desired spot. Push the barbed end of the emitter firmly into the hole until it seats snugly - this creates a watertight seal. If you accidentally punch a hole in the wrong place, you can close it with a goof plug, which is typically included in most kits.
Adjustable emitters let you control the flow rate for each plant, which is useful when growing crops with different water needs in the same bed. For example, tomatoes and peppers may benefit from a higher flow rate, while herbs or leafy greens may need less. Turn the emitter cap to increase or decrease the flow, starting with a moderate setting and observing how quickly the soil saturates during your first few watering cycles.
Spacing depends on plant type and density. For closely spaced greens or carrots, place emitters every 6 to 8 inches. For larger plants like tomatoes, squash, or peppers, one or two emitters per plant - spaced 10 to 12 inches apart - is usually sufficient. In sandy soil, place emitters closer together since water spreads less laterally; in clay or loam, you can space them a bit wider.
One advantage of drip irrigation is flexibility. As your garden evolves, you can move emitters, add new ones, or remove them without replacing the entire line. This makes it easy to adapt your system as seedlings mature, crop rotations change, or you experiment with new plantings. Just keep the punch tool and a few extra emitters on hand for adjustments throughout the season.
Step 5: Test the System and Make Adjustments
Once your drip irrigation system is assembled and in place, turn on the water supply slowly. Start with low pressure and gradually open the valve to avoid sudden surges that could dislodge emitters or burst tubing connections.
Walk along each bed and check every emitter. You're looking for a steady, consistent drip - not a spray or trickle. If an emitter is flowing too quickly, it may be partially clogged or positioned at a lower elevation than others. If it's too slow or not dripping at all, check for kinks in the tubing, clogs in the emitter barb, or a connection that isn't fully seated.
Seal any visible leaks at connection points by pressing fittings more firmly into the tubing or replacing damaged sections. If tubing has shifted away from plant roots, reposition it and add new stakes to hold it in place. Small adjustments now will save water and effort later.
Let the system run for 15 to 30 minutes during your first test. Observe how water spreads through the soil. Sandy soils will show narrow, deep wetting patterns, while clay soils spread moisture more broadly but slowly. Use this observation to decide whether emitters need to be moved closer together or farther apart.
Don't expect perfection on the first run. Drip systems reward patience and iterative tweaking. Mark problem spots, make one change at a time, and test again. Over a few sessions, you'll dial in the flow and coverage that works for your beds, your soil, and your plants.
Common Mistakes to Avoid
Even with careful planning, a few common setup mistakes can reduce efficiency or cause leaks. Recognizing these early saves time and water.
One frequent issue is failing to flush the system before closing the end caps. Dirt and debris from manufacturing or assembly can clog emitters within days. Run water through open lines for 30 seconds, then cap them - this simple step prevents most blockages.
Over-tightening connectors is another pitfall. Compression fittings and barbed adapters need only finger-tight pressure plus a quarter turn. Forcing them can crack plastic threads or split tubing, especially in cold weather. If a connection leaks, check the seal and O-ring before applying more torque.
Placing emitters too far from plant roots wastes water and stresses seedlings. In loose raised bed soil, water spreads roughly six inches laterally from each emitter. Position drippers within four inches of the stem for young plants, adjusting as roots expand. For row crops, space emitters every 12 inches along the line rather than clustering them at one end.
Forgetting to account for water pressure is less obvious but equally important. Household pressure above 50 psi can blow fittings or cause uneven flow. A simple pressure regulator installed at the timer or hose connection keeps output steady and protects the system. If some emitters barely drip while others gush, pressure imbalance is often the cause.
Finally, many beginners skip the end-of-season flush and winterization. Algae, mineral deposits, and residual water can freeze and crack components. Before the first hard freeze, disconnect the timer, open all end caps, and let the lines drain completely. Store above-ground parts indoors if temperatures drop below 20°F regularly.
Trial and error is normal. Most systems need one or two adjustments in the first week as you observe soil moisture and plant response. Small tweaks - moving an emitter, adding a tee, or adjusting run time - are easier than overhauling the layout later.
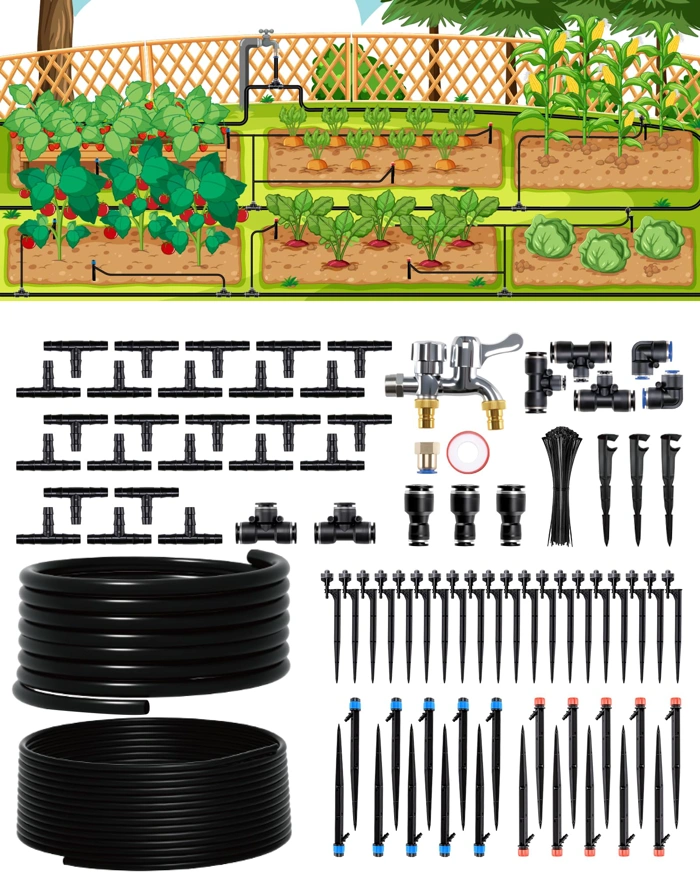
IRRIGARDENER Drip Irrigation System with 180FT Tubing, Dual Faucet & Adjustable Emitters
The IRRIGARDENER Drip Irrigation System provides the listed size of tubing, a dual faucet adapter, and adjustable emitters in one package. At $34.99, it offers a budget-friendly entry point for gardeners who want all the basic components without piecing together individual parts.
The 180-foot tubing length works well if you're watering multiple raised beds in different locations or running lines across longer distances. You won't need to splice additional tubing for most backyard setups, and the extra length gives you room to reconfigure your layout as your garden grows.
The dual faucet adapter lets you connect two separate irrigation zones to a single outdoor tap. This is useful when you want to water raised beds on opposite sides of your yard or run one line to vegetables and another to herbs, each on its own timer or schedule.
Adjustable emitters allow you to control flow at each plant location. Tomatoes and peppers can receive more water, while herbs or drought-tolerant plants get less. This customization helps prevent overwatering some crops while underwatering others, and you can make changes as your plants mature.
The kit is suitable for beginners who prefer a complete set over building a system from scratch. Everything you need to connect to a standard garden faucet and begin watering is included, though you'll still need to plan your layout and secure the tubing in place.
If you have several beds or want room to expand, this kit offers plenty of tubing and flexibility. The dual faucet feature and adjustable emitters add versatility without a significant price increase over simpler kits.
- ✅ 180 feet of tubing covers multiple beds or longer runs
- ✅ Dual faucet adapter connects two zones to one tap
- ✅ Adjustable emitters customize flow for different plants
- ✅ $34.99 price includes all basic components
- ⚠️ Requires layout planning and tubing securing
- ⚠️ Extra length may be unnecessary for single small beds
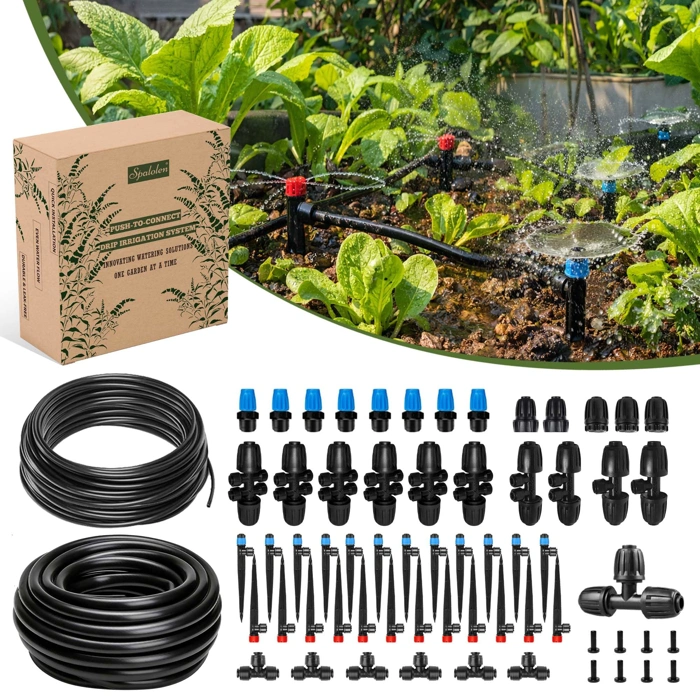
Spalolen Push-to-Connect Drip Irrigation System with Adjustable Emitters
The Spalolen Push-to-Connect Drip Irrigation System with Adjustable Emitters is built around tool-free assembly. Every connection uses push-to-connect fittings - you press the tubing into the connector until it clicks, and it's locked. No wrenches, no hose clamps, no fumbling with tiny barbs. For beginners setting up their first drip system in raised beds, this design removes much of the frustration that comes with traditional compression fittings.
Each emitter is adjustable, letting you dial flow from a slow drip to a faster stream depending on the plant. Leafy greens might need less; thirsty tomatoes or squash might want more. You twist the emitter cap to open or close the flow, giving you precise control at each plant without changing tubing layout or swapping parts.
At $42.99, the kit sits in the middle of the price range - not the cheapest starter option, but not a premium multi-zone controller either. You're paying for the convenience of snap-together fittings and the flexibility of adjustable emitters. If you value quick setup over absolute lowest cost, that tradeoff makes sense.
The push-to-connect design is especially forgiving during layout. You can snap a line together, test it, pull a section apart, reroute, and reconnect without tools or damaged fittings. That trial-and-error friendliness is valuable when you're still learning optimal emitter spacing or adjusting for uneven bed dimensions.
The adjustable emitters do add one step: you'll need to tune each one after installation to match your plants' needs. Fixed-flow emitters are set-and-forget; adjustable emitters require a quick walk-through to dial in the right flow for each spot. But that same adjustability means you can adapt as plants grow or as you rotate crops season to season.
If you prefer tool-free setup and straightforward connections, this push-to-connect design makes installation quick and forgiving.
- ✅ Push-to-connect fittings require no tools or clamps
- ✅ Adjustable emitters let you tune flow for each plant
- ✅ Easy to disconnect and reroute during setup
- ✅ Mid-range price at $42.99
- ⚠️ Adjustable emitters require manual tuning after installation
- ⚠️ Not the lowest-cost option for fixed, simple layouts
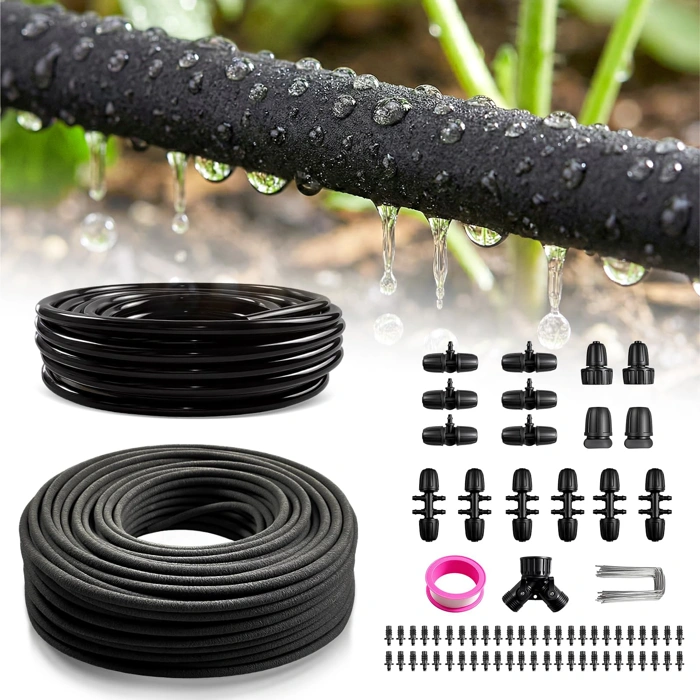
230FT Drip Irrigation System with 1/4" Soaker Hose & Weeping Technology
The 230FT Drip Irrigation System with 1/4" Soaker Hose & Weeping Technology offers an alternative to systems that rely on discrete emitters. Instead of placing individual drip points, this kit uses soaker hose sections that weep water along their length, delivering moisture continuously across the tubing. At $49.99, it provides the listed size of tubing, making it suitable for larger setups or gardens with multiple raised beds.
This approach works well in densely planted beds where spacing individual emitters becomes tedious or impractical. The weeping technology allows water to seep through the hose walls, creating an even distribution along the entire run rather than targeting specific plants. This can simplify installation in beds with closely spaced crops or companion planting arrangements.
The tradeoff is less precision than adjustable emitters. Because water seeps continuously along the hose, you cannot target specific plants or adjust flow to individual zones within the same line. This system is best suited to beds where plants have similar water needs and are planted uniformly. It may not be ideal if you grow a mix of drought-tolerant and moisture-loving crops in the same bed.
The 230-foot length gives you flexibility to cover multiple beds or create long runs without splicing additional tubing. Setup involves laying the soaker hose in the desired pattern and connecting it to a water source via the included fittings. Because the hose weeps along its length, plan your layout to ensure even coverage without overlapping runs or leaving gaps.
If you have wide or densely planted beds and prefer continuous seepage over individual drip points, this soaker-style system may suit you well.
- ✅ 230 feet of tubing covers large or multiple raised beds
- ✅ Weeping technology delivers continuous moisture along the hose length
- ✅ Simplifies installation in densely planted beds
- ✅ Eliminates need to place individual emitters
- ⚠️ Less precise than adjustable emitter systems
- ⚠️ Not ideal for beds with mixed water requirements
- ⚠️ Difficult to target individual plants or adjust flow by zone
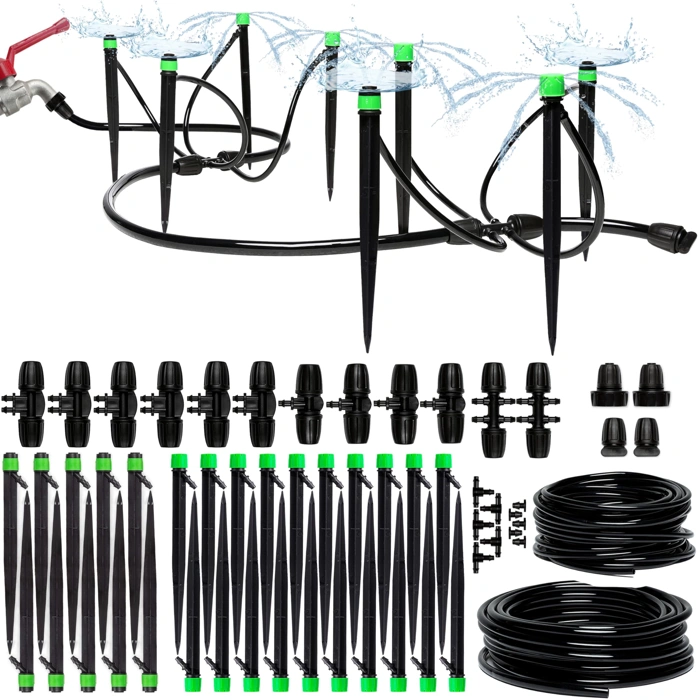
CARPATHEN Drip Irrigation System with Adjustable Sprinkler Emitters, 5/16" & 1/4" Tubing
The CARPATHEN Drip Irrigation System stands out by including both 5/16" and 1/4" tubing in one kit, giving you more options when routing lines through beds with different spacing or plant densities. The dual-tubing approach means you can run the larger diameter line as a main feed and branch off with the narrower tubing to reach individual pots or tightly spaced rows without wasting material or creating clutter.
This kit also ships with adjustable sprinkler-style emitters that can cover small areas rather than delivering water to a single point. That flexibility is useful if you have seedling trays, densely planted herb beds, or transplants that benefit from a gentle spray pattern instead of concentrated drips. You can dial the flow up or down on each emitter to match what's planted nearby, and swap between drip stakes and spray heads as your garden evolves through the season.
At $44.97 with a 4.5/5 rating, the kit sits in the mid-range for complete drip setups. The extra tubing size and emitter variety add versatility, but you'll need to plan your layout carefully to make the most of both diameters - running mixed tubing without a clear map can make troubleshooting harder if a line clogs or a connection leaks. If your beds have consistent spacing and you prefer a simpler single-tubing design, a standard kit may be easier to manage. But if you're working with varied planting styles or want the option to expand into containers and in-ground rows later, the dual-tubing design offers room to adapt.
If you want flexibility to customize tubing size and emitter style for different bed zones, this dual-tubing kit offers extra versatility. Check current price and availability.
- ✅ Includes both 5/16" and 1/4" tubing for flexible layout options
- ✅ Adjustable sprinkler emitters allow spray or drip delivery
- ✅ Useful for mixed planting styles and varying bed spacing
- ⚠️ Mixed tubing sizes require more careful planning and mapping
- ⚠️ Mid-range price may exceed budget for simple, single-bed setups
Final Takeaway
Setting up a drip irrigation system for your raised garden beds is a manageable weekend project that delivers lasting benefits. Once in place, you'll save time on daily watering, reduce water waste, and create more consistent growing conditions for your vegetables and herbs.
If you're new to drip irrigation, consider starting with a single bed. This lets you practice laying tubing, placing emitters, and adjusting flow rates without feeling overwhelmed. Once you're comfortable with how the system works and how your plants respond, expanding to additional beds becomes straightforward.
Expect to make adjustments as you go. You might find that some plants need emitters moved closer or that a section of tubing needs better anchoring. This trial-and-error process is normal and helps you fine-tune the setup for your specific garden layout and soil conditions.
Drip irrigation won't eliminate all garden tasks, but it does free up time and mental energy. Instead of dragging hoses every evening, you can focus on harvesting, pruning, and observing how your plants are growing. For homesteaders juggling multiple projects, that shift makes a real difference.
Keep this guide handy as a reference when you're ready to add more beds or troubleshoot a line that's not flowing correctly. Every garden is different, and learning what works for your site is part of the process. Taking this step toward more efficient water management is something to celebrate - it's one more system in place that supports a productive, sustainable homestead.