⭐ #1 Pick
Harvest
Check Price →Grow your own. Live sustainably. Build a wholesome future.
We believe in the power of growing your own food, nurturing the soil, and living a more connected life. At Wrench & Leaf Homestead, we cut through the overwhelm, offering clear, step-by-step guidance for families eager to embrace self-sufficiency. From your first tomato plant to your thriving flock of chickens, we're here to equip you with the knowledge and trusted tools. Let's get our hands dirty together and cultivate a richer, more sustainable way of living, right in your own backyard.
Interactive Tool
A saveable, printable checklist that helps backyard chicken keepers stay on top of seasonal flock care. It adapts tasks by season, flock stage, flock size, and common homestead conditions.

Guide
A composting station that keeps bears, raccoons, and mice out of your organic waste means you can compost without worry on your homestead. The right setup uses straightforward materials and thoughtful design to create a barrier animals can't breach. This guide walks through building a secure composting system that handles the realities of rural living. You'll learn which materials work best for deterring different animals, how to construct a frame that holds up to determined wildlife, and what design features make the difference between a compost pile that attracts trouble and one that processes waste safely. The approach focuses on practical solutions you can implement with basic tools and readily available supplies, giving you a composting system that works with your property instead of inviting unwanted visitors.
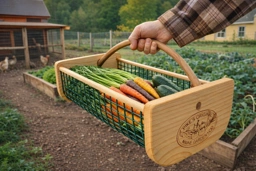
This isn't just a basket — it's the tool that changed how I harvest. One ingenious wire bottom, and suddenly rinsing root vegetables at the hose feels like it was always supposed to work this way.. I bought this Maine Garden Hod a while ago and now I can't imagine harvesting without it. The wire bottom is genius — I rinse carrots and potatoes right at the garden hose, dirt falling through without soaking the vegetables. Built from solid oak and food-safe coated wire, it handles muddy root crops and delicate tomatoes equally well. At 16 quarts and just 5 pounds, it holds a serious harvest without getting awkward, and my kids can help carry it too. What surprised me is how much I use it off-season — it's currently holding seed packets in my potting shed. It's one of those tools that earns its spot by the back door and genuinely gets better with age. I bought this Maine Garden Hod a while ago and now.
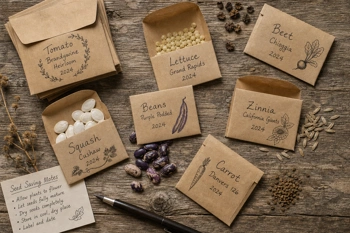
Keeping seeds viable means storing them in the right envelopes. The material you choose affects how well your seeds stay protected from moisture, light, and temperature swings. Paper envelopes offer breathability, while foil-lined options add a moisture barrier for long-term storage. Glassine provides a middle ground with some water resistance and visibility. Size matters too - cramped seeds can crack, and oversized packets waste space. Look for envelopes that let you label clearly with variety names and harvest dates. Some come pre-printed with fields for tracking germination rates and planting notes. Whether you're saving heirloom tomatoes or organizing a large seed library, matching envelope features to your storage conditions makes the difference between seeds that sprout reliably next season and ones that disappoint.
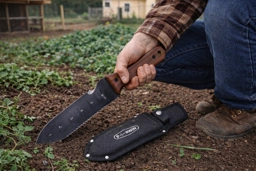
Hori Hori Garden Knife: The ultimate multi-purpose garden tool!. I was skeptical about needing another garden tool until I used a Hori Hori. Now it lives in my back pocket all season. The double-edged blade handles everything - sharp side for roots, serrated edge for twine and bags, depth markings for transplanting. The full-tang wood handle has held up through two years of heavy use without wobbling. What sold me is how it replaced four tools I used to carry around. I've dug with it, harvested potatoes, cut asparagus, and opened stuck compost bins. The sheath clips to my belt so it's always there. If you're tired of switching between trowel, knife, and dibber all day, this will change how you work. I was skeptical about needing another garden tool until I used a Hori Hori.
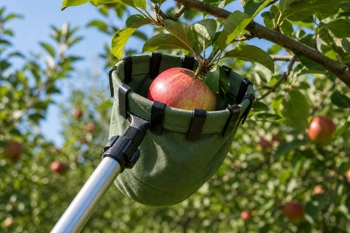
Reaching high fruit without climbing a ladder isn't just convenient - it can prevent a serious fall. Long-handled pickers extend your reach by several feet, letting you twist off apples, pears, and citrus while keeping both feet on solid ground. These tools typically feature a basket or claw mechanism at the end of a pole, designed to cradle fruit gently as you pull it free. Some use telescoping poles that collapse for storage, while others offer fixed lengths for sturdier performance. After reviewing five popular models, we found that the right picker depends on your specific needs: the height of your trees, the type of fruit you grow, and how often you harvest.
QR Code Plant Labels & Tracker. I was skeptical about bringing tech into my garden, but these QR labels have changed how I track my plants. Each stainless steel stake has a unique QR code that links to a digital log where I record planting dates, variety names, fertilizing schedules, and harvest notes - all accessible from my phone while I'm standing in the bed. No more trying to remember which tomato is which or when I last fed the blueberries. The voice-to-text feature means I can log observations without stopping to type, and the waterproof 304 stainless steel holds up through rain, sun, and snow without fading. What surprised me is how useful it's become for tracking heirloom seed performance and troubleshooting problems - I can pull up last year's notes instantly to compare growth patterns.
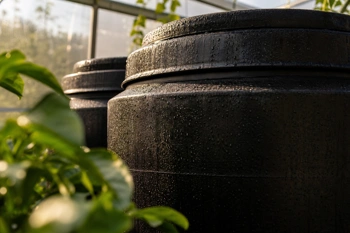
Understanding thermal mass can transform how you protect your garden through cold nights. Water barrels positioned in your greenhouse or cold frame soak up warmth from sunlight throughout the day. As temperatures drop after sunset, that stored heat releases slowly into the surrounding air, creating a buffer zone that keeps frost from damaging tender plants. The principle is straightforward: water holds heat far better than air, and a few well-placed containers can raise overnight temperatures by several crucial degrees. No power source needed, no ongoing fuel costs. This passive heating method works reliably in spring and fall when late or early frosts threaten your growing season, giving you extra weeks of production with minimal investment.
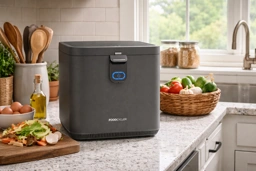
Turn kitchen scraps into nutrient-rich plant food in hours, not months—odorless, silent, and perfect for homesteaders without outdoor space. . I hesitated at the price, but the FoodCycler has completely changed how I handle kitchen waste. It grinds everything from vegetable peels to chicken bones into dry, odorless compost in under five hours - reducing volume by nearly 90% and eliminating winter trips to an outdoor bin. The 5-liter bucket sits right on the counter, the carbon filter keeps it genuinely odorless, and it runs quieter than my dishwasher. What I didn't anticipate was how much it would shift my gardening rhythm. I add the finished product directly to raised beds or potting soil, and the plants respond immediately. For apartment homesteaders, those with limited outdoor space, or anyone tired of managing a traditional compost pile, this bridges the gap between waste and fertility. It's an investment that pays back in convenience and soil health every single.
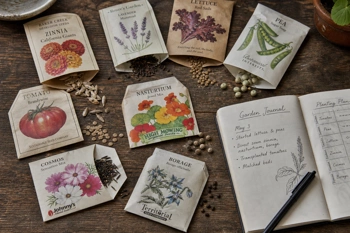
Heirloom seeds give you something modern hybrids and GMOs don't: you can save seeds from your harvest and plant them again next season with full confidence they'll grow true to type. Over time, these open-pollinated varieties naturally adjust to your specific growing conditions, becoming better suited to your soil and local weather patterns. This means you're not locked into buying new seed packets every spring. You build a self-sustaining garden that gets stronger and more reliable with each passing year. For gardeners who value independence and long-term planning, heirlooms make practical sense. You're investing in plants that work with you, not against you, while preserving genetic diversity that's been maintained across generations.
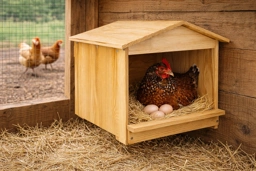
Three compartment wall mounted chicken nesting box. I've tried plastic bins and repurposed milk crates, but this solid pine nesting box is what finally ended my daily egg hunt. The three compartments mount right to the coop wall, and the perching bar actually keeps my hens from scratching all the bedding onto the floor. What sold me was the wooden construction—it stays cooler in summer than metal boxes, and my girls genuinely prefer laying here over anywhere else in the run. The baffles catch eggs before they roll and crack, which means fewer losses and cleaner collection. Setup took maybe twenty minutes, and at just under 12 inches wide, it doesn't eat up precious coop space. If you're tired of finding crushed eggs in random corners or dealing with hens who won't use their nesting areas.
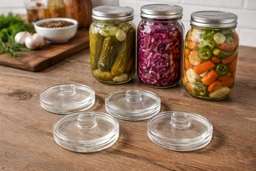
Masontops Pickle Pebble Glass Fermenting Weights. I lost two batches of sauerkraut to mold before I started using these glass weights, and now fermentation actually works. The Pickle Pebbles fit perfectly in both regular and wide-mouth jars, keeping everything submerged so kahm yeast doesn't take over. The finger grips make them easy to pull out when it's time to taste, and they go straight in the dishwasher between batches. What matters most is the glass - unlike plastic, it doesn't hold onto smells, so my pickle brine doesn't taste like last month's kimchi. They're simple, durable, and they've turned fermentation from a gamble into something I can count on. If you're serious about preserving your harvest beyond canning, these are worth having. I lost two batches of sauerkraut to mold before I started using these glass weights.
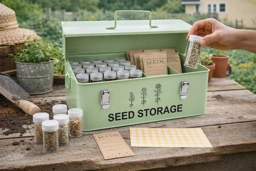
60 slot metal seed storage box. After years of storing seeds in mason jars and envelopes scattered across my mudroom, this organizer finally brought order to my seed collection. The metal construction with powder coating won't rust, and the light-proof design keeps seeds viable longer than clear plastic containers. It holds 60 small bottles for tiny seeds like lettuce and herbs, plus 20 envelopes for larger seeds like beans and squash. The three compartments let me separate spring crops, fall plantings, and flowers, and the dual safety locks mean nothing spills if I knock it off the shelf. What sold me was the sponge liner that cushions the bottles—no more broken glass or crushed seeds. The included labels make it easy to track varieties and harvest years. If you're serious about seed saving or just.

Briteree waxed canvas woodworking apron. This waxed canvas apron has become my go-to for everything from building chicken coops to repairing garden beds. The 20 oz canvas is thick enough to stop wood shavings and protect against sharp edges, and the wax coating sheds sawdust and light rain without feeling stiff. Nine pockets of different sizes hold my tape measure, pencil, utility knife, screws, and phone—the chest pockets are perfect for keeping fasteners sorted, and the hammer loop actually holds weight. The magnetic catch keeps nails and bits from spilling, and the padded shoulder straps distribute the weight so I can wear it all day without neck strain. The adjustable x-back fit works whether I'm layered up in winter or in a t-shirt during summer projects. It's substantial enough for workshop use but flexible.
Looking for something specific? Browse the full archive of guides, reviews, and practical tools.
We scour forums, manuals, and verified owner reviews to find the gear that actually lasts. No fluff, just facts.
Is there something you'd like to see covered? Or a question we didn't answer? Drop us an email and let us know.