I spent years wrestling with flimsy plastic seed trays that cracked after one season, roots that circled themselves into stressed tangles, and seedlings that wilted the moment I tried transplanting them. Then a fellow gardener showed me her soil blocks-these compact, free-standing cubes of potting mix that she just popped directly into the garden bed.
No plastic. No root disturbance. No transplant shock.
Soil blocking is an old European technique that's having a quiet renaissance among homesteaders and market gardeners who are tired of the plastic tray treadmill. Instead of filling containers, you compress specially formulated potting mix into firm blocks using a metal blocking tool. Each block has a small indentation for your seed and enough structural integrity to hold together through the entire growing cycle.
The learning curve is real but short. Your first batch might crumble. By your third tray, you'll wonder why you ever bothered with those disposable cell packs. I'm going to walk you through exactly how to start soil blocking, what tools actually matter, and how to avoid the common mistakes that make beginners give up too soon.
What Makes Soil Blocking Worth the Effort
Let's be honest-soil blocking requires more upfront effort than dumping seeds into a plastic tray. You need to mix your blocking medium to the right consistency, get the compression technique down, and keep the blocks properly moist. So why bother?
Healthier root systems. This is the big one. In traditional containers, roots hit the wall and start circling. This creates what's called a 'root-bound' plant-stressed, slower to establish, and more vulnerable after transplanting. Soil blocks get 'air-pruned' instead. When a root reaches the edge of the block and hits air, it stops growing and sends out new feeder roots deeper in the block. You get a dense, fibrous root system instead of a tangled mess.
Zero transplant shock. You're not ripping roots away from plastic or peat pots. The entire block goes into the ground intact. I've transplanted soil-blocked tomatoes on a hot afternoon (not recommended, but life happens) and watched them keep growing like nothing happened.
No more plastic waste. According to the EPA, less than 9% of plastic actually gets recycled. Those seed trays you think you're reusing? They're getting brittle and leaching who-knows-what into your organic potting mix. Soil blocking eliminates that entire category of single-use plastic from your homestead.
Space efficiency. Blocks sit directly on trays with no wasted space between individual cells. You can fit about 20% more seedlings in the same footprint as cell packs.
The technique isn't perfect for everything. Tiny seeds like lettuce can be fussy. Very long-season crops might outgrow even large blocks. But for tomatoes, peppers, brassicas, cucurbits, and herbs? It's become my default method.

Ladbrooke Mini 4 Soil Blocker (2-inch, 4-block)
This is the tool that starts most people's soil blocking journey, and for good reason. The Ladbrooke Mini 4 (2-inch) blocker makes four blocks at a time-the perfect size for most vegetable seedlings from germination through their first few weeks of growth.
It's made from galvanized steel with a wooden handle that's comfortable even when you're making 100+ blocks for spring planting. The ejection plate works smoothly, and the construction is solid enough that gardeners pass these down to their kids. I've used mine for four seasons with zero degradation.
The 2-inch size holds about 3-4 weeks of growth for tomatoes and peppers before you need to pot up. That's enough time to get them hardened off and into the garden in most climates. Each block uses roughly 2 tablespoons of blocking mix, so a small batch goes a long way.
Some people start with cheaper plastic blockers. I tried one. It cracked during the second tray and made inconsistent blocks. If you're going to soil block seriously, skip the experimental phase and get the Ladbrooke. It'll outlive your gardening phase and still be working when you're teaching your grandkids to start seeds.
- ✅ Lifetime durability
- ✅ Makes consistent, firm blocks
- ✅ Comfortable wooden handle
- ✅ Professional quality
- ⚠️ Higher upfront cost than plastic alternatives
- ⚠️ Requires proper blocking mix to work well

Ladbrooke Micro 20 Soil Blocker (¾-inch, 20-block)
If you're starting large quantities of seeds or want to maximize your germination space, the Micro 20 makes twenty ¾-inch micro-blocks in one press. I use these primarily for starting seeds that I'll later transplant into 2-inch blocks-a technique called 'blocking up' that gives you incredible space efficiency.
Here's the workflow: Start 80 tomato seeds in micro-blocks on one standard 10x20 tray. As they germinate and develop their first true leaves, transplant the strongest 40 into 2-inch blocks. You've just selected for vigor and eliminated half your floor space for those critical first two weeks under lights.
The Mini 4 has the same built-quality as its bigger sibling. The pin that creates the planting indent is removable, which matters for cleaning. These tiny blocks dry out faster than 2-inch blocks, so you need to be more attentive with watering, but the space savings during germination season are substantial.
This is an upgrade tool, not a starter tool. Get comfortable with the 2-inch blocker first, then add this if you're starting hundreds of seedlings or want to try the blocking-up method.
- ✅ Makes 20 blocks per press
- ✅ Perfect for high-volume seed starting
- ✅ Enables space-saving blocking-up technique
- ✅ Same Ladbrooke durability
- ⚠️ Micro-blocks require frequent watering
- ⚠️ Only useful if you're starting lots of seeds
- ⚠️ Learning curve for blocking-up transplants
The Blocking Mix Recipe That Actually Works
Regular potting soil won't cut it for soil blocking. It needs to be fine-textured enough to compress into a firm block, moisture-retentive enough to stay intact, but not so heavy that it becomes waterlogged. The consistency is closer to brownie batter than typical potting mix.
After testing various recipes from Eliot Coleman's The New Organic Grower and Johnny's Selected Seeds technical guides, here's the mix I use:
- 3 parts peat moss or coco coir (I've switched to coir for sustainability)
- 2 parts good compost (screened to remove chunks)
- 1 part perlite
- ¼ part greensand or colloidal phosphate (slow-release minerals)
- Optional: 2 tablespoons of organic fertilizer per gallon of mix
The key is moisture content. Add water gradually and mix thoroughly-you want the mix to hold together when squeezed but not drip water. Too dry and your blocks crumble. Too wet and they slump into sad puddles. The right consistency feels like a wrung-out sponge.
I mix mine in a large plastic tub the night before blocking. Letting it sit for 12 hours allows the moisture to distribute evenly, which gives you much more consistent blocks. Some gardeners swear by adding a tiny amount of clay soil (like 5%) to improve binding, but I haven't found it necessary with properly moistened coir-based mix.
One warning: Don't use mixes with large bark chunks or wood chips. They prevent proper compression and create weak blocks that fall apart when you try to move them.
Your First Soil Blocking Session: Step-by-Step
- Prepare blocking mix to brownie-batter consistency the night before
- Set out a rigid flat tray or board to hold finished blocks
- Fill a shallow tub with your blocking mix (3-4 inches deep works well)
- Dip blocker into water, then pack it firmly into the mix with a twisting motion
- Scrape excess mix off the top using the edge of your tub
- Lift blocker and eject blocks onto your tray with firm, even pressure
- Use a dibbler or pencil to deepen the seed indent if needed
- Plant seeds immediately while blocks are fresh and moist
- Label your trays clearly (trust me, you'll forget which is which)
- Water gently with a mister or very gentle shower until blocks glisten
- Place under lights or in a warm germination area
- Check moisture daily-blocks should stay uniformly dark and damp
The Mistakes That Make Beginners Quit
Crumbly blocks that fall apart: This is almost always a moisture issue. Your mix is too dry. Add water in small amounts, mix thoroughly, and let it rest. The mix should hold its shape when you squeeze a handful, with maybe one or two drops of water coming out.
Slumping blocks that lose their shape: Too wet, or your mix doesn't have enough structure. If you're using pure peat, try switching to a peat-coir blend or adding a bit more perlite. Also make sure you're compressing firmly when you pack the blocker-wimpy packing makes weak blocks.
Mold on the surface: Usually caused by overwatering combined with poor air circulation. Soil blocks need to breathe. A small fan running on low in your seed-starting area helps tremendously. Water less frequently but more thoroughly when you do water.
Blocks drying out too fast: This is common with micro-blocks or if your space is very warm and dry. Cover your tray with a humidity dome until germination, then remove it. You can also set blocks on capillary matting to provide bottom moisture, though I haven't found this necessary with 2-inch blocks.
Seeds planted too deep: The indent on a soil block is often shallower than beginners expect. Large seeds like squash and beans can go deeper, but tomatoes, peppers, and most flowers need to be barely covered. When in doubt, plant shallower.
Give yourself grace for the first batch. I've taught this technique to a dozen people, and everyone struggles initially with moisture consistency. By the second or third session, it becomes intuitive.
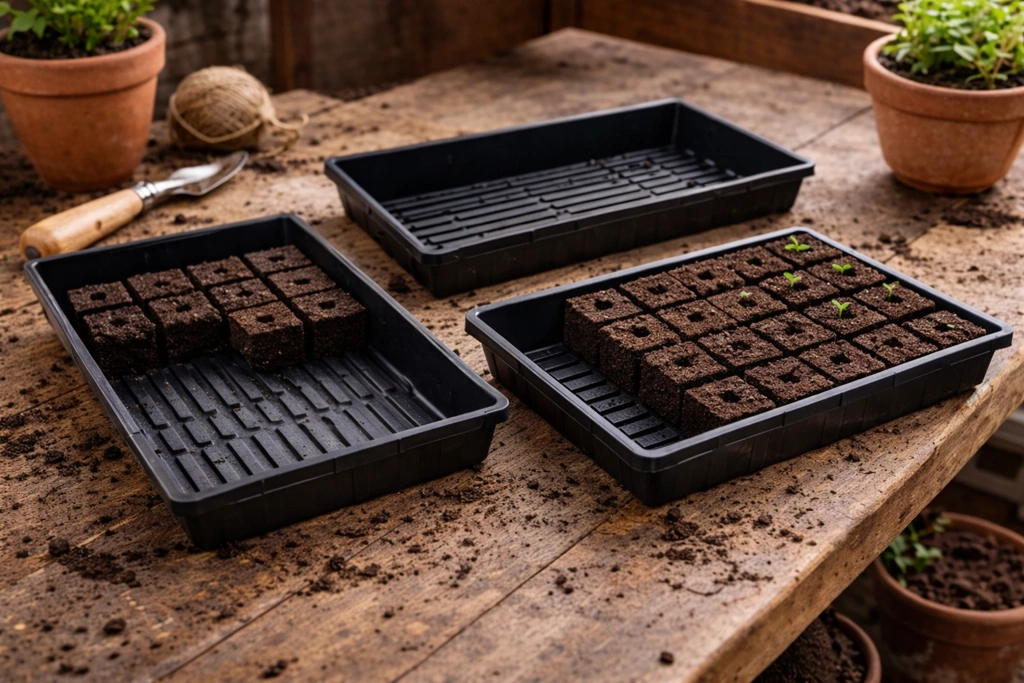
Bootstrap Farmer Heavy Duty Propagation Trays
You need something rigid to hold your soil blocks, and those flimsy plastic trays from the garden center won't cut it. They bow under the weight of wet blocks and make moving seedlings around a nerve-wracking experience.
Bootstrap Farmer's heavy-duty trays are thick, commercial-grade plastic that stays rigid even when fully loaded. They have drainage holes, but they're small enough that you're not dripping mud all over your seed-starting shelf. The standard 10x20 size fits perfectly under grow lights and holds about 32 of the 2-inch blocks comfortably.
These are legitimately reusable for years. I'm in season four with my original set, and they show no signs of cracking or warping. At about three dollars per tray when you buy a multi-pack, they're a worthwhile upgrade from the disposable options.
One tip: Get both the trays with holes and the solid-bottom versions. Use the solid trays as catch trays underneath the holed trays. This creates a small water reservoir that keeps blocks evenly moist without waterlogging them.
- ✅ Commercial-grade thickness
- ✅ Won't bow under weight
- ✅ Actually reusable for multiple seasons
- ✅ Fits standard growing spaces
- ⚠️ More expensive than cheap alternatives
- ⚠️ Heavier to move when full
What to Grow (And What to Skip)
Soil blocking works brilliantly for plants that benefit from an undisturbed root system and have medium-to-large seeds. Here's what I've had the most success with:
Perfect for soil blocks: Tomatoes, peppers, eggplant, all the brassicas (broccoli, cabbage, kale, cauliflower), cucumbers, squash, melons, basil, and other large-seeded herbs. These plants hate root disturbance and thrive when blocked.
Works well with practice: Lettuce, onions, and leeks can be done in micro-blocks if you're careful. Flowers like zinnias, marigolds, and cosmos do fine. Beans and peas technically work but they grow so fast and transplant so easily that blocking feels like overkill.
Skip it: Root vegetables like carrots, beets, and radishes are almost always direct-seeded. Anything with dust-fine seeds (petunias, snapdragons) is fussy in blocks. Super long-season crops like celery might outgrow even large blocks before your transplant window.
The best way to learn is to start with tomatoes or peppers. They're forgiving, you probably want to grow them anyway, and the difference in root quality compared to plastic cells is immediately obvious when you transplant.
Watering Soil Blocks Without Washing Them Away
This is the skill that separates successful soil blockers from people who try it once and go back to plastic. Blocks have much more surface area exposed to air than containerized seedlings, so moisture management is critical.
For the first few days after blocking, keep the tray covered with a humidity dome or plastic wrap. This maintains moisture during germination without requiring you to water. Once seedlings emerge, remove the cover and start monitoring daily.
I use a small pump sprayer set to a fine mist for the first week after germination. Seedlings are delicate, and a strong stream will topple them. As they develop true leaves and the blocks stabilize, I switch to a gentle watering can with a rose head (the sprinkler attachment).
The blocks should stay uniformly dark brown. If they're lightening to tan on the top or edges, they need water. If they're slumping or you see water pooling in the bottom tray, you've overdone it. The goal is consistent moisture, not saturated or cycling between wet and dry.
Bottom watering works if you're careful. Pour water into the solid catch tray and let the blocks wick it up for 10-15 minutes, then dump any excess. This prevents top crust from forming and keeps the moisture even, but it's easy to overdo and create waterlogged blocks.
Some gardeners swear by capillary matting-a fabric that sits between the blocks and tray, staying perpetually damp. I haven't found it necessary for 2-inch blocks, but it's helpful for micro-blocks or if you tend to underwater.
Is Soil Blocking Actually Worth It for a Small Garden?
If you're only starting a dozen tomato plants each spring, probably not. The upfront cost of a quality blocker and the learning curve might outweigh the benefits. You can grow perfectly good seedlings in reused yogurt cups.
But if any of these apply to you, soil blocking makes sense:
- You start 50+ seedlings per season and you're tired of buying or storing plastic trays
- You're trying to eliminate plastic from your homestead practices
- You grow varieties that are sensitive to transplant shock (heirloom tomatoes, melons, cucumbers)
- You've struggled with root-bound seedlings in the past
- You're a market gardener or serious about succession planting
For me, the tipping point was waste reduction. I was buying new cell packs every year because the old ones cracked, and I hated it. Soil blocking aligned with the broader homesteading principle of investing in durable tools that reduce ongoing consumption.
The blocks themselves become compost at the end of the season. The blocker will outlast me. And my seedlings establish faster in the garden, which matters when you're trying to squeeze in fall crops or beat the first frost.
Start small. Get a 2-inch blocker and try it with one tray of tomatoes. If you hate it, you're out about thirty dollars and you learned something. If it clicks-and I think it will-you'll wonder why everyone isn't doing this.