We may earn a commission when you buy through links on this page, at no extra cost to you. How this works.
Homesteaders and gardeners who save heirloom seeds face a simple but critical decision each fall: how to store those seeds so they remain viable until spring planting. The envelopes you choose play a surprisingly large role in whether your carefully harvested varieties survive winter storage with their germination rates intact.
Seed viability depends on stable temperature, low humidity, and protection from light and pests. A poor envelope choice can trap moisture, allow mold to develop, or let rodents and insects reach your seeds before you do. On the other hand, the right envelope material breathes enough to prevent condensation while still shielding seeds from environmental swings and physical damage.
This guide walks through the materials, features, and practical storage options that matter most when selecting seed-saving envelopes for heirloom varieties. You'll see comparisons of paper types, closures, labeling surfaces, and sizes so you can match your envelope to your storage conditions and seed types. Whether you store seeds in a basement, shed, or climate-controlled space, understanding these differences helps you make a choice that keeps your heirloom collection strong season after season.
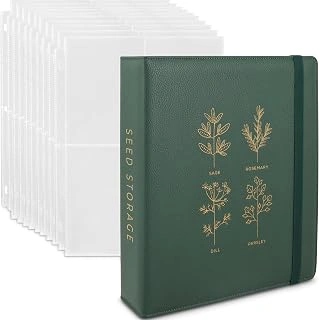
Seed Storage Organizer Binder with 50 Sheet Protectors for 200 Seed Envelopes
Gardeners who save seeds from a dozen or more varieties each season often struggle with loose envelopes sliding around in drawers or stacking unevenly on shelves. The Seed Storage Organizer Binder with 50 Sheet Protectors addresses that challenge by holding up to 200 seed envelopes in clear, protective sleeves that stay flat and accessible. Each sheet protector accommodates four envelopes, so you can flip through your entire collection without handling individual packets or risking tears and spills.
The binder format keeps envelopes upright and visible, which makes it easier to compare planting dates, note germination rates, or confirm variety names at a glance. Because the sleeves are clear, you can read labels and observe seed color or size without opening anything. This setup works well if you rotate stock each year or cross-reference notes from previous seasons. The structure also protects envelopes from moisture, dust, and accidental creasing during storage.
At $39.99, this system costs more than buying loose envelopes or a simple box, but the investment pays off if you value organization and plan to expand your seed library over time. The binder holds enough capacity for a serious home seed-saving operation, and the rigid cover shields contents from shelf wear. If you save only a handful of varieties or prefer minimal gear, a smaller storage solution may suit you better. For committed seed savers who want a shelf-ready system that grows with their collection, this binder delivers both protection and structure season after season.
- ✅ Holds up to 200 seed envelopes in clear, protective sheet protectors
- ✅ Binder format keeps envelopes flat, visible, and easy to flip through
- ✅ Protects packets from moisture, dust, and handling damage
- ✅ Rigid cover shields contents during shelf storage
- ⚠️ $39.99 upfront cost is higher than loose envelopes or simple boxes
- ⚠️ Large capacity may exceed needs for gardeners saving only a few varieties
Why Proper Seed Storage is Crucial for Heirloom Varieties
Heirloom seeds lose viability faster than commercial hybrids when storage conditions fluctuate. Moisture is the primary threat during winter months - even small amounts of humidity can trigger premature germination or encourage mold that destroys the embryo inside each seed. Light exposure degrades the protective seed coat over time, while temperature swings cause condensation that introduces water exactly where you don't want it.
Heirloom varieties lack the chemical seed treatments and moisture-resistant coatings found on many store-bought seeds. This makes them more vulnerable to environmental stress during the months between harvest and spring planting. A tomato seed stored in a damp basement may sprout fungus within weeks, while the same seed kept dry and dark can remain viable for five years or longer.
Seed-saving envelopes serve as the first line of defense against humidity and physical damage. Paper envelopes breathe, allowing residual moisture from freshly dried seeds to escape rather than trap it against the seed surface. They block light that would otherwise break down oils and proteins essential for germination. A properly chosen envelope also prevents seeds from scattering, getting crushed, or mixing with other varieties during handling and storage.
The difference between a successful spring garden and a tray of empty soil often comes down to how well you controlled moisture and light during the off-season. Envelopes that wick away humidity and shield seeds from air currents give heirloom varieties the stable, protective environment they need to stay dormant until you're ready to plant.
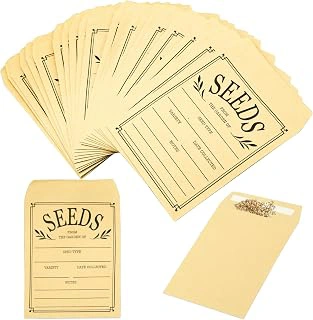
100 Brown Paper Seed Envelopes with Self-Adhesive Seal, 3.1x4.7 Inch
These brown paper envelopes offer a straightforward, budget-friendly entry point for homesteaders starting to save heirloom seeds. At $8.99 for 100 envelopes, the per-unit cost makes them accessible whether you're organizing five varieties or fifty. The 3.1x4.7 inch size accommodates most vegetable and herb seeds without wasted space, and the self-adhesive seal reduces the need for licking or separate tape.
The kraft paper construction provides natural breathability, allowing residual moisture to escape while keeping seeds dry in stable indoor conditions. This material works well for seeds that have been properly dried before storage - tomatoes, peppers, beans, and lettuce varieties all store reliably in this format. Because the envelopes are opaque, you'll want to label them clearly on the front with variety name, harvest date, and any germination notes. The lack of a transparent window means you can't visually confirm contents without opening, but the tradeoff is a simpler design that holds up well to repeated handling.
The self-adhesive flap is the practical advantage here. Unlike fold-over or tuck-style closures, the seal stays secure even when envelopes are stacked vertically in a filing box or drawer. If you need to reopen an envelope mid-season to share seeds or check condition, the adhesive lifts gently without tearing the paper, though resealing may require a small piece of tape. The brown kraft finish also accepts pencil, pen, and most markers without smudging, so labeling stays legible season after season.
These envelopes don't include moisture indicators or reinforced corners, features found in specialty seed-storage products. For most homestead conditions - cool, dry basements, closets, or pantry shelves - this level of simplicity is enough. If you're storing seeds in a damp root cellar or unheated outbuilding, you'll need to pair these envelopes with desiccant packets or a sealed container for added protection. The 4.8/5 rating reflects their reliability for standard use, and the hundred-count gives you room to experiment with multiple varieties without worrying about running out mid-harvest. If you're just getting started with seed saving or managing a modest number of heirloom varieties, this pack delivers practical performance at a price that won't strain a homestead budget.
- ✅ Affordable at $8.99 for 100 envelopes
- ✅ Self-adhesive seal stays secure in vertical storage
- ✅ Breathable kraft paper suitable for most dried seeds
- ✅ 3.1x4.7 inch size fits vegetable and herb varieties
- ✅ Accepts pencil and pen for durable labeling
- ⚠️ No transparent window to view contents without opening
- ⚠️ Requires additional moisture control in damp storage areas
- ⚠️ Resealing after opening may need tape
What to Look For: Key Features of High-Quality Seed Envelopes
Selecting the right seed-saving envelope starts with understanding how each design element affects seed viability during months of storage. Breathability ranks as the most critical feature: envelopes must allow moisture to escape while preventing condensation buildup that triggers mold or premature germination. Paper envelopes with uncoated surfaces offer natural air exchange, while coated or laminated materials can trap humidity and compromise dormant seeds.
Seal quality determines whether your seeds stay contained through handling and seasonal temperature shifts. Gummed flaps require moisture to activate and create a firm bond, which works well for long-term storage but adds a step during busy harvest windows. Self-sealing adhesive strips save time and effort, though some adhesives weaken in fluctuating humidity or release prematurely if stored in warm spaces. Fold-and-tuck closures provide the simplest option but depend on careful folding and external clips or rubber bands to stay secure.
Size matters more than many gardeners expect. Standard coin envelopes suit small seed batches - lettuce, herbs, or single-variety tomato harvests - but larger packets are necessary for beans, squash, or bulk collections from multiple plants. An envelope that forces you to overfill risks tearing at the seams, while oversized packets waste storage space and make organization harder. Matching envelope dimensions to your typical harvest volume prevents both problems.
Labeling space should accommodate variety name, harvest date, and any notes about plant performance or seed source. Smooth, uncoated front panels accept pencil, pen, or marker without smudging, and matte finishes resist fingerprint oils that can obscure handwriting over time. Some envelopes include pre-printed fields for common details, which speeds up labeling but limits flexibility if your record-keeping needs differ.
Material transparency presents a tradeoff. Clear windows or translucent envelopes let you verify contents at a glance, reducing the need to open packets repeatedly during inventory checks. However, light exposure degrades seed viability in photo-sensitive species such as lettuce and celery. Opaque paper shields seeds from light but requires you to label meticulously or open each envelope to confirm what's inside. Most homestead seed savers prioritize light protection and rely on detailed labels, accepting the extra moment needed to identify packets by reading rather than viewing.
Durability under real storage conditions closes the evaluation. Thin paper tears easily when stacked or shifted, especially if seeds have sharp edges or if you move packets frequently during the off-season. Heavier-weight stock resists punctures and holds up through multiple growing cycles if you reuse envelopes. Look for reinforced seams or double-fold construction in high-traffic storage systems, and avoid envelopes with decorative finishes that flake or peel, leaving residue that could contaminate seeds.
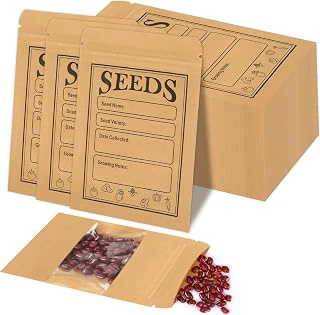
100 Seed Saving Envelopes with Clear Window, 4.7x3.1 Inch
Finding a specific variety in a large seed collection takes time when every envelope looks the same. The 100 Seed Saving Envelopes with Clear Window solve that problem with a transparent panel that shows the seeds inside without opening the packet. Priced at $7.99 and rated 4.6 out of 5, this set costs slightly more than plain envelopes but saves effort when you need to locate a particular variety quickly during spring planting.
The clear window lets you verify seed size, color, and quantity at a glance, which helps when you're deciding whether to use saved seeds or buy fresh. You can write the variety name, harvest date, and notes on the paper portion while still seeing what's inside. The 4.7 by 3.1 inch size fits most heirloom seeds comfortably, from small lettuce to larger beans.
The tradeoff is light exposure. While the paper body blocks UV, the plastic window allows more light to reach the seeds than a fully opaque envelope. This matters less if you store your collection in a closed cabinet, drawer, or box where ambient light stays low. The convenience of quick visual identification works best for gardeners who maintain organized seed libraries and access them in controlled conditions rather than leaving envelopes on open shelves.
Compared to budget plain envelopes, this option adds a few dollars but reduces handling. You won't need to open and reseal packets just to check contents, which keeps seeds drier and minimizes contamination risk. If you store seeds in a dark, dry space and value faster selection at planting time, the window feature offers practical value for the small price difference.
- ✅ Clear window allows visual seed identification without opening
- ✅ Reduces handling and maintains better seal integrity
- ✅ 4.7x3.1 inch size accommodates most heirloom varieties
- ✅ Faster selection during busy planting season
- ⚠️ Window allows more light exposure than fully opaque envelopes
- ⚠️ Slightly higher price than plain paper options
- ⚠️ Best suited for closed storage rather than open shelving
Material Breakdown: Paper vs. Glassine vs. Foil for Seed Viability
The material you choose determines how well moisture moves in and out of the envelope, which directly affects seed viability through winter. Most homesteaders store seeds in closets, basements, or unheated rooms where humidity fluctuates, so understanding material behavior helps you match the envelope to your actual conditions.
Paper envelopes - usually kraft or recycled stock - allow air exchange. Seeds naturally release small amounts of moisture after harvest, and paper lets that vapor escape instead of trapping it against the seed coat. This breathability works well when seeds are thoroughly dried before storage and kept in a spot with stable, moderate humidity. Paper is inexpensive, easy to label by hand, and biodegradable. The tradeoff is that paper offers no barrier against sudden humidity spikes if your storage area swings between damp and dry.
Glassine envelopes are made from pressed, calendered paper that creates a smooth, translucent surface. Glassine resists grease and moisture better than plain paper while still allowing limited air exchange. It adds a layer of protection for seeds stored in spaces that occasionally see higher humidity - a basement corner, a shed with seasonal temperature shifts, or a closet near an exterior wall. Glassine costs more than kraft paper but less than foil options, and it stays biodegradable. It will not seal out moisture as aggressively as foil, so seeds still need to be dry before you tuck them away.
Foil-lined or metalized envelopes block both air and moisture almost completely. These are designed for long-term storage in fluctuating or high-humidity environments, or for commercial growers who ship seeds across varied climates. For backyard seed saving, foil becomes overkill unless your storage space is genuinely problematic - think a damp cellar or a garage that freezes and thaws repeatedly. Foil envelopes cost the most, are not biodegradable, and require seeds to be dried to very low moisture levels before sealing; any residual dampness has nowhere to go and can lead to mold or rot inside the pouch.
For most homestead storage - a cool, dry closet or a pantry shelf - plain paper works well once seeds are fully dried. Glassine makes sense if you want extra insurance without the expense and waste of foil, especially for high-value heirloom varieties you plan to keep for several seasons.
How to Properly Label and Seal Envelopes for Long-Term Storage
Proper labeling turns a simple envelope into a reliable archive that protects your heirloom seed collection for years. The moment you seal an unlabeled envelope, you risk mixing varieties or losing track of harvest dates that signal germination windows.
Use a soft graphite pencil or a pigment-based permanent marker on the envelope front. Graphite stays legible longer than ballpoint ink, which can fade or smudge when stored in humid conditions. Write the full variety name - not just "tomato" but "this product, Sudduth's Strain" - along with the harvest date and the year. If you saved seed from a particularly vigorous plant or noticed unusual traits, add a short note such as "early producer" or "disease-resistant parent."
Include the source if the seed came from a neighbor, seed swap, or specific garden bed, and record any cross-pollination risks you observed during the growing season. This extra detail helps you decide which seeds to plant first and which lines to isolate next year. If you store multiple envelopes in one container, a second label on the back or a reference number linked to a garden journal keeps your system organized.
Sealing technique matters as much as the label itself. Seeds need to breathe, so avoid airtight plastic bags or heavy tape that traps residual moisture and invites mold. Fold the flap down firmly and use a single piece of low-tack painter's tape or a simple tuck closure. Some gardeners prefer self-sealing envelopes with a moisture-resistant gum, but these work only if the seeds are completely dry before you close the flap. If you notice any condensation inside the envelope after sealing, open it immediately and spread the seeds on a screen for another day or two of drying.
Check moisture content one last time before you seal: bend a seed gently between your fingers. If it flexes rather than snaps, it still holds too much water. Store labeled and sealed envelopes upright in a this product box or a shallow drawer, and keep the container in a cool, dark space with stable humidity. This final inspection step prevents spoilage and ensures your heirloom varieties stay viable through winter and beyond.
Winter Seed Storage Checklist
- Dry seeds completely before sealing envelopes
- Label each envelope with variety name and harvest date
- Store envelopes in a cool, dark, and dry location
- Keep seeds away from temperature fluctuations
- Check moisture levels in storage area periodically
- Avoid plastic bags or airtight containers that trap moisture
Best Practices for Storing Your Seed Collection Over Winter
Seed viability drops fast when storage conditions swing outside the safe zone. Temperature and humidity are the two factors you need to control if you want your heirloom varieties to germinate next spring. Most vegetable and flower seeds stay viable longest when kept between 32°F and 41°F with relative humidity below 40 percent. A cool, dark basement corner or an interior closet away from exterior walls typically delivers more stable conditions than a kitchen drawer near the stove or an unheated shed where temperatures swing with the weather.
Light accelerates breakdown of stored seed, so keep envelopes inside a closed container. A wooden box, metal recipe tin, or three-ring binder with opaque covers all work well as long as they shield contents from sunlight and dust. Glass jars are popular, but they concentrate condensation if the room temperature changes quickly, so only use them when seeds are completely dry and the storage area stays steady. Some gardeners drop a food-grade silica gel packet into each box to buffer humidity spikes; just check it every few weeks and refresh when saturated.
Refrigerators seem like an obvious choice because they are cool, but most models run humid and cycle temperatures every time the door opens. If you do refrigerate, make sure seeds are bone-dry first and seal envelopes inside an airtight container with a desiccant pack. Otherwise, moisture condenses on cold envelopes the moment you pull them out, and that brief exposure can cut germination rates. Freezers are even riskier unless you commit to long-term storage and never thaw partially.
Common mistakes include storing seeds in the garage where summer heat builds, tucking them behind the refrigerator where warmth radiates from the compressor, or leaving envelopes on a sunny windowsill for easy access. Even a week of poor conditions can shorten viable life by a year or more. Check your storage spot with a simple thermometer and hygrometer before the first frost, and move your collection if readings creep outside the target range. Consistent cool and dry beats convenient every time.
A Quick Guide to Making Your Own DIY Seed Packets
Making your own seed packets from scrap paper gives you a no-cost way to organize small batches, and it turns seed-saving into a satisfying craft project for the whole family. You only need plain paper - printer stock, brown grocery bags, or even old newspaper work fine - plus scissors or a bone folder for crisp creases. Fold a rectangle in half lengthwise, crease the bottom edge up about an inch, fold the sides in to overlap slightly, then tuck or glue the flaps closed. Label each packet with variety, harvest date, and any notes on pollination before you fill it.
Paper quality matters less for short-term storage, but thinner stock can tear when handled repeatedly, and newsprint transfers ink if your seeds are damp. Heavier paper or a double fold adds durability without adding much work. You can also trace or print a simple template so every packet folds to the same size, which makes filing easier if you store dozens of varieties.
DIY packets shine when you have only a handful of seeds per variety or want to involve children in the labeling and decorating process. They also let you customize the size to fit very large beans or tiny lettuce seed without wasting material. On the other hand, store-bought envelopes arrive pre-scored, stack neatly, and include printed grids for tracking information, so they save time when you're processing twenty varieties in an afternoon. For most homesteaders, a hybrid approach works well: buy commercial envelopes for your main collection and fold paper packets for overflow, gifts, or seed swaps.
Final Thoughts: Choosing the Right Envelopes for Your Seed-Saving Goals
Selecting the right seed-saving envelopes depends on the size of your collection, how often you access your seeds, and the storage space you have available. The binder system works well for gardeners managing dozens of varieties who want everything labeled and visible in one place. Budget coin envelopes suit beginners testing the waters with a handful of heirloom crops, offering a low-cost entry point that still provides adequate protection. Windowed envelopes split the difference, giving you quick visual identification without the bulk of a binder.
No envelope, regardless of material or design, can compensate for poor storage conditions. Keep your envelopes in a cool, dry, dark location where temperature swings stay minimal. A bedroom closet or basement shelf away from exterior walls usually works better than a garage or shed. Silica gel packets tucked into storage boxes help manage ambient moisture, and checking your seeds mid-winter lets you catch problems before viability drops.
Start with the scale that matches your current practice. A dozen varieties fit comfortably in a shoebox with coin envelopes; thirty or more benefit from the structure a binder provides. As your collection grows, you can always upgrade your system. The envelope is simply the first layer of protection - consistent care through the dormant months is what keeps heirloom genetics viable season after season.