We may earn a commission when you buy through links on this page, at no extra cost to you. How this works.
Plastic seed trays pile up fast. Every spring, gardeners buy more, store them between seasons, or watch them crack and head to the landfill. Soil blocking offers a way to skip that cycle entirely. Instead of individual cells, you press damp potting mix into free-standing blocks that hold their shape and let roots breathe.
The technique replaces plastic with a simple hand tool and a reliable soil recipe. Seedlings grow in blocks that air-prune their roots, so transplant shock drops and root circling stops before it starts.
This guide walks through the soil mix you need, the blocking process from start to finish, daily watering strategies, and how to move blocks into the garden without disturbing young plants. You'll also find troubleshooting tips for blocks that crumble or dry too quickly, so your first tray of soil blocks works as well as your fiftieth.
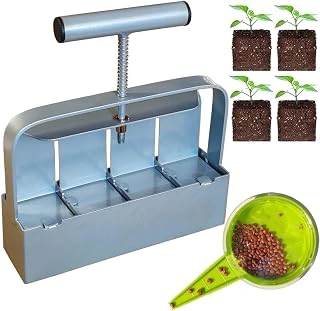
2 Inch 4-Cell Handheld Heavy Duty Soil Block Maker for Seed Starting
The 2 Inch 4-Cell Handheld Heavy Duty Soil Block Maker makes four 2-inch cubes at once, sized for most vegetable and herb seedlings. The handheld design doesn't need a stand or press frame. You fill the chambers by pushing the tool into a tray of moist mix, level the top with your hand, and press down on a flat surface to eject the blocks. The heavy-duty build holds up through repeated cycles.
This tool is priced at $21.99 and carries a 4.6/5 rating. The 2-inch size gives roots enough room to grow for three to four weeks before transplanting, which suits tomatoes, peppers, squash, and other common crops. The four-block layout means you'll need more presses to fill a standard tray compared to a twelve-cell model, but the smaller footprint is easier to store and handle when bench space is tight.
The ejection mechanism works best when the soil mix is at the right moisture level - wet enough to hold together but not so wet that the blocks slump after release. If your mix is too dry, the blocks crumble. If it's too wet, they stick inside the chambers. A quick test press before committing to a full batch will show you whether to add water or let the mix rest.
Because the tool forms four blocks per press, filling a multiple-block tray takes eighteen cycles. The process is faster than potting into individual cells but slower than a multi-block press. For gardeners starting fifty to a hundred seedlings, the pace is manageable. For commercial-scale production, a larger or multi-block setup saves time.
Check current price and customer reviews to compare this handheld model against other soil block makers in different sizes and configurations.
- ✅ Makes four 2-inch blocks per press, sized for most vegetables
- ✅ Handheld design doesn't require a stand or frame
- ✅ Heavy-duty construction for repeated use
- ✅ Priced at $21.99
- ⚠️ Four-block layout requires more presses to fill a full tray
- ⚠️ Ejection depends on correct soil moisture balance
What Is a Soil Block Maker and Why Choose It Over Plastic Trays?
A soil block maker is a hand-operated press that forms potting mix into freestanding cubes, each with a dimple for a seed. You load damp soil into the chambers, push the plunger against a flat surface, and eject uniform blocks that stand on their own without any container.
Roots grow until they reach the air at the edge of the block, then naturally prune themselves instead of circling. That means no root-bound spirals and less shock when you move seedlings into the garden or a larger pot. The blocks transplant cleanly - soil ball and all - because the roots aren't tangled around plastic walls.
Plastic trays need washing, storage space, and eventual replacement when they crack. A metal soil blocker lasts decades with basic rinsing. You also skip the yearly purchase and disposal of insert cells, which pile up quickly across a season of succession planting.
Blocks do dry out faster than enclosed cells, so you'll water more often in the early weeks. But for growers starting dozens or hundreds of seedlings each spring, the trade-off between slightly more frequent watering and zero plastic waste typically tips in favor of blocks.
Creating the Perfect Soil Mix Recipe for Sturdy Blocks
A reliable soil block mix uses three parts peat moss or coco coir, two parts finished compost, and one part perlite or vermiculite by volume. Add two to three tablespoons of lime per gallon of mix to buffer pH if you're using peat. Compost brings nutrients and this product microbes, while perlite keeps the blocks from compacting as they dry.
The texture matters more than exact measurements. Mix your ingredients dry first, then add water slowly while stirring. You want the consistency of a wrung-out sponge: wet enough that a handful holds its shape when squeezed but no water drips out. Too wet and the blocks slump when ejected. Too dry and they crumble before roots establish.
If your blocks dry out fast indoors, increase compost slightly for better moisture retention. In humid climates, add extra perlite to improve drainage and airflow. Some growers replace half the peat with screened garden soil for weight, which helps anchor taller seedlings. Test a small batch first, press a few blocks, and adjust before mixing a full tray's worth.
Let the mixed soil sit for an hour before blocking. Ingredients hydrate fully and the texture evens out, making ejection cleaner and reducing gaps inside the blocks.
Step-by-Step: How to Form Soil Blocks with Your Maker
Dip the block maker into your prepared mix until every cavity fills completely. Push it down firmly to pack the mix, then lift straight up. The blocks should hold their shape inside the maker.
Flip the maker over above your tray or board. Press the plunger down in one smooth motion. The blocks drop out as neat cubes.
If your blocks crumble when you eject them, the mix is too dry. Add water a few tablespoons at a time and stir thoroughly. Test again.
If blocks slump or lose their corners after ejection, the mix is too wet. Work in more dry ingredients or wait ten minutes for the peat to absorb excess moisture, then remix.
Press firmly when you dip. Light packing leaves air pockets that collapse. Each cavity needs even pressure to hold together.
Space your ejected blocks on the tray so they barely touch. They'll support each other without merging as roots grow.
The first few blocks often look rough. By the fifth or sixth, you'll feel the right dip depth and plunger speed. Adjust your mix before you form a full tray, not after.
How to Seed Your Soil Blocks and Label Varieties
Place one or two seeds into the dimple at the top of each block. If germination rates for a variety are historically strong, one seed per block is enough. If you're working with older seed or a crop that germinates inconsistently, two seeds give you insurance.
Cover each seed to the depth printed on the packet. Most lettuce, herbs, and brassicas need light and only a dusting of soil. Tomatoes, peppers, and squash prefer a quarter-inch layer. Use dry potting mix, sieved compost, or vermiculite to lightly brush over the dimple.
Mist the surface with a spray bottle until the top layer darkens but water doesn't pool. A hard stream from a watering can will dislodge seeds or wash them to the edge of the block.
Label every tray before you move to the next variety. Plant markers, masking tape on the tray edge, or a waterproof pen on a popsicle stick all work. Write the variety name and the date you seeded. When you start four kinds of kale or six heirloom tomatoes on the same afternoon, identical blocks become impossible to tell apart once the first leaves emerge.
If you seeded two per block and both germinate, snip the weaker seedling at soil level with scissors once the first true leaves appear. Pulling risks disturbing the roots of the keeper.
Watering and Caring for Seedlings in Soil Blocks
Soil blocks dry faster than plastic cells because air reaches every side. Check moisture daily by touching the surface and lifting a corner block to feel its weight.
Bottom-watering works best. Pour water into the tray until it reaches halfway up the block sides, then let the blocks wick moisture for ten to fifteen minutes. Dump any standing water after that window.
Top misting with a spray bottle helps when seedlings first emerge and roots haven't reached the block edges yet. Once cotyledons open, switch to bottom-watering to avoid damping off. Mist only the block surface, not the leaves.
Blocks should feel firm but not hard. A block that crumbles when you pick it up is too dry. One that slumps or feels spongy is too wet. Adjust watering frequency rather than volume.
Seedlings need twelve to sixteen hours of light per day. A south-facing window works if you rotate trays daily to prevent leaning. Grow lights should sit two to four inches above the tops of the seedlings and rise as they grow.
Thin to one seedling per block once the first true leaves appear. Snip extras at soil level with scissors rather than pulling, which disturbs roots.
If you hold blocks longer than four weeks, roots may start circling the bottom. Up-pot into a larger soil block or transplant directly into the garden to avoid stunted growth. Roots poking through the block sides signal it's time to move.
Transplanting Soil Blocks Directly into the Garden
Soil blocks transplant into the garden without disturbing the roots. Because there's no container to remove, you place the entire block directly into the planting hole. The seedling's roots grow straight through the block walls into the surrounding soil instead of circling or binding.
Before transplanting, harden off your seedlings for seven to ten days. Move them outdoors to a sheltered spot for increasing amounts of time each day, so they adjust to wind, temperature swings, and direct sun.
Dig a hole slightly larger than the block. Set the block so its top sits level with or just below the soil surface. Firm the garden soil gently around the sides to eliminate air gaps.
Water immediately after planting, soaking the block and the surrounding soil. The block will absorb moisture and bond with the garden bed. Keep the area consistently moist for the first week while the roots establish outward growth.
The seamless transition from block to bed means less transplant shock and faster establishment. Seedlings resume active growth within days because the root system remains intact and the soil environment stays continuous.
Troubleshooting Common Soil Blocking Problems
Blocks that crumble when you lift them are too dry. Add water slowly to your mix and re-blend. The consistency should feel like brownie batter - moist enough to hold a squeeze without water dripping out.
If your blocks slump or lose their shape within an hour, the mix is too wet. Let it rest for ten minutes, then add more peat moss or coconut coir and mix again. You can also add a small amount of dry compost to absorb excess moisture.
A white or greenish fuzz on the block surface is surface mold, usually caused by poor airflow. Move your blocks to a spot with better ventilation or run a small fan on low nearby. The seedlings themselves are typically fine; the issue is environmental, not in the soil.
Uneven germination across your tray points to inconsistent temperature or light. Check that your heat mat maintains steady warmth and that all blocks receive similar light exposure. Rotate the tray daily if one side gets more sun or sits closer to a lamp.
Blocks drying out too fast? Increase humidity by covering with a humidity dome until seedlings emerge, then remove it gradually. If blocks dry unevenly, the edges may need misting while the center stays moist.
When blocks stick in the mold, your mix likely needs more water or you're pressing too hard. A light, even press and proper moisture let blocks release cleanly every time.
Cleaning and Storing Your Soil Block Maker Between Seasons
Rinse your soil block maker with plain water as soon as you finish pressing blocks. Soil left in the cells will harden and become difficult to remove later.
For stubborn residue, use a stiff brush or an old toothbrush to scrub between the cell walls. A little dish soap helps break down compacted soil, but most of the time water and elbow grease are enough.
Dry the tool completely before you put it away. Metal block makers can rust if stored damp. Set the tool on a towel or hang it in a warm spot until every surface is dry to the touch.
Store it in a dry location away from direct moisture. A shelf in the shed, basement, or garage works well as long as the area stays reasonably dry through the off-season. Proper cleaning and drying now will keep the tool ready for years of spring seed starts.
Final Thoughts: Why Soil Blocking Fits a Zero-Waste Homestead
Soil blocking eliminates single-use plastic trays from your seed starting setup. The blocker is reusable for decades. The blocks themselves are compressed soil that decompose after transplant, leaving no waste to discard or wash.
Seedlings grown in blocks develop stronger roots. Air pruning at the edges prevents circling and root binding, so plants establish faster when moved to the garden.
The upfront learning curve is real. Your first batch may crumble or dry out unevenly. But the technique becomes intuitive after a few trays. Start with one flat of tomatoes or lettuce rather than your entire spring garden. Adjust soil moisture and tray depth as you go.
Once dialed in, the method scales easily. A single four-block tool can produce hundreds of seedlings over a season. Larger blockers speed the process when you're ready to expand.
The payoff is both practical and philosophical. You spend less money on disposable supplies each year. Your seedlings transplant with less shock. And the system aligns with the closed-loop thinking that drives a zero-waste homestead: use what you have, reuse what works, and send nothing to the landfill.
Gathering Your Supplies: What You'll Need for Soil Blocking
- Handheld soil block maker (4-cell, 2-inch is standard for most seedlings)
- Peat moss or coir as the base ingredient
- Vermiculite or perlite for aeration
- Finished compost for nutrients
- Garden lime to adjust pH
- Large mixing tub or bucket
- Shallow tray without drainage holes
- Watering can with fine rose or spray bottle