This guide is for backyard chicken keepers who want to protect their flock from predators while providing safe outdoor space.
Electric poultry netting offers an effective barrier against raccoons, foxes, dogs, and other threats. It's portable, relatively easy to install, and gives your chickens freedom to forage.
Many beginners feel uncertain about working with electric fencing. The process is actually straightforward when you understand the basic components and follow the right steps.
This article walks you through everything from selecting your system to testing the completed fence. You'll learn practical installation techniques that work for first-time users.
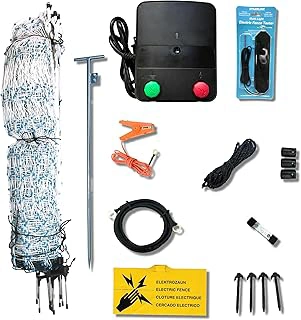
Starkline Electric Poultry Netting Kit with AC Energizer, 48" x164' White/Blue
This complete kit includes everything beginners need to start protecting their chickens immediately. The 48-inch height effectively deters climbing predators, while the 164-foot length creates an enclosure spacious enough for a medium-sized flock.
The included AC energizer delivers reliable power without the maintenance requirements of batteries or solar panels. This makes the system particularly suitable for fixed locations near electrical outlets.
The white and blue color scheme provides high visibility for both humans and chickens, helping your birds learn the boundary quickly. Installation is straightforward with the integrated support posts.
With a 4.2 out of 5 rating, users appreciate the complete package that eliminates guesswork about component compatibility.
- ✅ Complete kit with all necessary components included
- ✅ 48-inch height provides effective predator deterrence
- ✅ 164-foot length covers substantial area
- ✅ AC energizer offers reliable, maintenance-free power
- ✅ High-visibility white and blue design
- ⚠️ Requires proximity to electrical outlet
- ⚠️ Less portable than solar-powered alternatives
- ⚠️ Single length may not suit all property sizes
What is Electric Poultry Netting and Why Do You Need It?
Electric poultry netting is a portable fence system designed specifically for chickens and other poultry. It combines plastic mesh with built-in support posts and electrified horizontal wires.
The fence delivers a brief, safe shock that deters predators without causing injury. Most predators learn quickly to avoid the barrier after one encounter.
Unlike permanent fencing, you can move electric netting easily to create fresh grazing areas. This mobility supports rotational grazing practices that improve soil health and give your birds access to new forage.
The netting also contains your chickens effectively. They learn to respect the boundary and stay within the protected area.
Key Components of an Electric Netting System
Every electric poultry netting system requires three essential components that work together.
The netting itself includes the mesh, support posts, and conductive horizontal strands. Quality netting stands 42 to 48 inches tall and comes in lengths from 50 to 164 feet.
An energizer (also called a charger or fencer) pulses electricity through the fence wires. You can choose between AC-powered units that plug into outlets, battery-powered models, or solar-powered options.
A ground rod completes the electrical circuit. When a predator touches the fence, electricity flows through their body to the ground and back to the energizer through the ground rod, delivering the deterrent shock.
Step 1: Preparing and Clearing Your Fence Area
Proper site preparation prevents most installation problems and ensures your fence functions correctly.
Walk your planned fence perimeter and remove tall grass, weeds, and debris. Vegetation touching the fence drains power and reduces the shock effectiveness.
Clear a strip about 12 inches wide along your fence line. Use a string trimmer, mower, or hand tools to create this vegetation-free zone.
Check for holes, burrows, or uneven ground that might allow predators to dig under. Fill any depressions with soil.
Mark the location where your energizer will be mounted and where your ground rod will be installed. These should be close together for efficient operation.
Step 2: Unrolling and Setting Up the Fence Posts
Begin at your energizer location and carefully unroll the netting. Electric poultry netting comes bundled with posts already attached at regular intervals.
Stand each post upright as you unroll. The posts typically have a single spike at the bottom that pushes into the ground.
Space posts evenly following the manufacturer's guidelines. Most systems place posts every 10 to 13 feet along the fence line.
Push posts firmly into the ground using your body weight. Step on the foot spike if provided, or use a rubber mallet if necessary. Avoid pounding with a hammer, which can damage the posts.
Keep the bottom of the netting close to the ground to prevent predators from crawling underneath.
Step 3: Installing the Ground Rod Correctly
The ground rod creates the return path for the electrical circuit. Without proper grounding, your fence won't deliver an effective shock.
Use a ground rod at least 3 feet long, ideally 4 to 6 feet. Copper-coated steel or galvanized rods work well.
Drive the rod vertically into the ground near your energizer location, leaving 2 to 4 inches above ground for the connection clamp. Choose moist soil if possible, as dry or sandy soil conducts electricity poorly.
In very dry conditions or sandy soil, you may need multiple ground rods spaced 6 to 8 feet apart and connected with ground wire.
Attach the ground wire from your energizer to the ground rod using a proper ground clamp.
Step 4: Connecting the Fence Energizer
Mount your energizer in a protected location away from weather and moisture. Many units mount directly on fence posts or dedicated stakes.
For AC-powered units, plug into a grounded outdoor outlet protected by a ground fault circuit interrupter (GFCI).
Connect the positive (hot) terminal from the energizer to the fence using the provided clips or connectors. Most netting systems have a clearly marked connection point.
Connect the negative (ground) terminal to your ground rod using ground clamps.
Double-check all connections before powering on. Loose connections reduce fence effectiveness and create troubleshooting headaches later.
Turn on the energizer only after all connections are secure and you've verified no one is touching the fence.
Step 5: Testing Your Fence and Training Your Chickens
Use a fence tester or voltage meter to verify your fence is working properly. Most poultry fencing should deliver between 3,000 and 5,000 volts.
Walk the entire perimeter and test at multiple points. Check for spots where vegetation touches the fence and drains power.
Before introducing chickens, consider training them to respect the boundary. Place feed and water well inside the fence area to discourage investigating the perimeter initially.
Chickens typically learn the fence boundary after one or two brief contacts. They'll quickly develop a healthy respect for the barrier.
Supervise your flock during their first few hours in the new enclosure to ensure they're adjusting well.
Essential Safety Precautions for Electric Fencing
Electric poultry fencing is designed to be safe for humans and animals when used correctly. The shock is brief and unpleasant but not dangerous to healthy individuals.
Always turn off the energizer before making repairs or adjustments to the fence. Never work on an energized fence.
Post clear warning signs indicating electric fencing is present. This protects visitors and delivery personnel from unexpected contact.
Keep children informed about the fence location and teach them not to touch it. Explain that it protects the chickens but delivers a surprising shock.
People with pacemakers or other medical devices should exercise extra caution around electric fences. Consult a physician if you have concerns.
Common Troubleshooting Tips for Your Poultry Netting
If your fence isn't delivering an adequate shock, start by checking the most common issues.
Low voltage readings: Look for vegetation touching the fence wires. Even light contact with grass or weeds drains significant power. Trim regularly to maintain the clear zone.
Intermittent operation: Check all connection points for corrosion or looseness. Clean corroded connections with a wire brush and tighten loose clamps.
No power: Verify your energizer is receiving electricity. Check circuit breakers, GFCI outlets, and power switches. Test the ground rod connection.
Uneven shock strength: Poor grounding often causes this issue. Add additional ground rods in dry or sandy soil conditions.
Regular maintenance and weekly voltage checks prevent most problems before they become serious.