Choosing the best location for a new beehive in a suburban backyard can feel overwhelming when you're just getting started with beekeeping. You want your bees to thrive, your neighbors to stay comfortable, and your own access to the hive to be safe and practical - but figuring out how to balance all those needs isn't always obvious.
The good news is that a handful of straightforward factors - sunlight exposure, drainage, proximity to neighbors, wind protection, and winter conditions - will guide you to the right spot. You don't need a perfect yard or years of experience to make a smart decision.
This guide walks you through each consideration step by step, so you can evaluate your space with confidence and set up your hive in a location that supports healthy bees and a smooth beekeeping experience from day one.
Who This Guide Is For
This guide is written for suburban homeowners who are planning their first beehive and need to make the most of limited yard space. If you're working with a typical suburban lot - often a quarter-acre or less - and juggling neighbor proximity, local zoning rules, and landscaping constraints, the location decisions covered here will help you set up a hive that works for both you and your community.
You don't need acreage or rural isolation to keep bees successfully. Many suburban beekeepers manage thriving colonies in backyards bordered by fences, patios, and vegetable gardens. What matters is understanding how sunlight, drainage, wind exposure, and flight paths interact with your specific property layout.
This guide also addresses beekeepers who need to balance hive placement with neighbor safety and comfort. If your yard shares a property line with a playground, dog run, or frequently used patio, the strategies here will show you how to position hives and use natural barriers to direct bee traffic upward and away from high-activity areas. Whether you're navigating homeowner association rules or simply want to be a considerate neighbor, the practical tips in each section will help you choose a location that supports healthy bees and positive community relationships.
What Matters Most When Choosing a Hive Location
Choosing a hive location begins with understanding five core factors that directly affect colony health and neighbor safety in a suburban setting. Morning sunlight, wind protection, drainage, water access, and flight path clearance each play a distinct role in creating a stable environment for your bees while reducing risks to people and pets nearby.
Morning sunlight is the most important factor because it warms the hive early in the day, encouraging bees to begin foraging sooner and helping the colony regulate temperature inside the hive. A location that receives direct sun from sunrise until at least mid-morning will support a stronger, more active colony throughout the season.
Wind protection matters because sustained wind chills the hive and forces bees to use more energy to maintain brood temperature. Positioning the hive behind a fence, hedge, or building wall that blocks prevailing winds - especially from the north and west - reduces colony stress and improves winter survival without blocking sunlight from the front of the hive.
Drainage prevents moisture buildup around the hive, which can lead to mold, rot, and disease inside the colony. A site with a gentle slope or raised ground ensures rainwater flows away from the hive stand, keeping the bottom board dry and the interior climate more stable.
Water access within a short flight distance is essential because bees need a reliable source for cooling the hive and diluting honey for feeding larvae. Placing a shallow water source with landing stones or floating cork within 50 feet of the hive reduces the chance that your bees will visit a neighbor's pool or pet bowl.
Flight path clearance means positioning the hive entrance so that bees climb to at least six feet before crossing walkways, play areas, or property lines. A tall fence, dense shrub, or trellis placed a few feet in front of the hive forces bees to gain altitude quickly, steering them over head height and away from foot traffic. This simple adjustment makes beekeeping safer in a yard shared with children, guests, and neighbors.
All five factors work together: a sunny, sheltered spot with good drainage, nearby water, and a flight path that rises above human activity will support a healthy colony and help you maintain good relationships in a suburban neighborhood.
Sunlight and Shade: Finding the Right Balance
Morning sunlight helps bees warm up quickly and begin foraging earlier in the day, especially in cooler months when every hour of flight time counts. A hive facing east or southeast receives gentle sun that energizes the colony without overheating brood chambers during peak summer afternoons. In hot climates, positioning the hive so it gains morning light but catches dappled shade by mid-afternoon prevents internal temperatures from climbing too high and forcing bees to spend energy on ventilation instead of foraging.
Full-day sun works well in moderate or northern climates where excess heat is rarely a problem and consistent warmth supports brood development through spring and fall. Conversely, placing a hive in dense, all-day shade can delay morning activity, slow spring buildup, and leave the colony vulnerable to dampness - particularly in humid regions where poor air circulation encourages mold inside the hive body.
Winter sun becomes especially valuable when cold weather limits flight opportunities. A south-facing position captures low-angle sunlight that warms the hive entrance and allows bees to take cleansing flights on milder winter days, reducing stress and maintaining colony health. Avoid locations where buildings or evergreen trees block winter sun entirely, as prolonged cold and darkness can weaken even a well-provisioned hive.
Balance sunlight with natural windbreaks rather than relying solely on shade structures, since a hive tucked behind a fence or hedge often receives filtered afternoon light while staying protected from gusts that can chill bees returning with nectar. The goal is a microclimate that encourages early activity, moderates midday heat, and captures warming rays when the colony needs them most.
Wind, Drainage, and Ground Conditions
Wind protection keeps bees comfortable and reduces their energy expenditure during cool weather, while good drainage prevents moisture from pooling under the hive and causing mold or decay. Position your hive where natural or structural wind breaks - such as fences, hedges, or garage walls - buffer strong gusts from the north and west, but avoid completely enclosed spaces that trap humid air. Low-lying areas that collect standing water after rain should be avoided, since wet ground can rot wooden hive components and increase humidity inside the colony.
A level, stable surface is essential to prevent the hive from tipping or leaning as it gains weight with honey and brood. Uneven ground stresses joints and can cause frames to shift, making inspections harder and potentially crushing bees. Set your hive on firm soil, pavers, or concrete blocks rather than soft turf that settles over time.
Using a hive stand raises the bottom board several inches above the ground, improving airflow underneath and discouraging pests like ants and mice. The added clearance also keeps the wooden base drier during wet seasons and makes inspections easier on your back. A simple stand made from treated lumber, cinder blocks, or a purpose-built frame works well in most suburban yards. Elevation also reduces splash-back from rain, which can carry soil and pathogens onto the landing board.
Together, wind protection, dry ground, and a stable stand create a microenvironment that supports hive health year-round without requiring constant intervention.
Neighbor Considerations and Flight Paths
Positioning your hive with neighbors in mind helps prevent tension and keeps bees flying safely above head height in shared spaces. Point hive entrances away from property lines, walkways, and areas where people gather, so foraging bees take off in a direction that minimizes encounters. A solid fence, hedge, or row of shrubs at least six feet tall forces bees to climb quickly after leaving the hive, lifting their flight path over yards and sidewalks rather than at face level.
Place hives at least ten feet from property boundaries when possible, and consider adding a water source near the hive to discourage bees from visiting neighbors' pools or birdbaths. Let adjacent neighbors know about your plans before installing the hive; a brief conversation explaining that bees typically forage hundreds of yards away and ignore people who aren't near the entrance goes a long way toward building goodwill.
If your lot is narrow, position the hive behind a garage, shed, or dense evergreen screen to create a natural barrier and redirect flight traffic. Avoid placing hives directly along shared driveways or near playground equipment. Thoughtful placement and a simple visual barrier turn a potentially contentious situation into a non-issue, letting you keep bees without worry.
Water Access and Forage Proximity
Bees need access to fresh water daily for cooling the hive, diluting honey, and feeding larvae, so a consistent water source within a few hundred feet helps reduce foraging trips and stress on the colony. A shallow birdbath, a small pond, or even a tray filled with pebbles and water can serve as a reliable station, as long as the surface provides stones, corks, or twigs for safe landing - bees drown easily in open water. Place the water source before you install your hive so foragers learn the location early and don't settle on a neighbor's pool or pet dish. If natural water is scarce, refresh the container every few days to prevent stagnation and mosquito breeding.
Proximity to diverse flowering plants also matters because shorter foraging distances mean less energy spent and more resources brought back to build comb and raise brood. Suburban yards often include gardens, flowering shrubs, clover lawns, and nearby parks, which can provide steady nectar and pollen from early spring through fall. If your yard lacks blooms, consider planting native wildflowers, herbs like lavender and thyme, or fruit trees within 100 to 300 feet of the hive to supplement forage and reduce the colony's reliance on distant sources. A hive placed near reliable water and varied forage will show stronger build-up in spring and more stable stores heading into winter, giving beginner beekeepers a visible sign that site selection is working in their favor.
Common Mistakes to Avoid
Placing a hive in full shade is one of the most common beginner mistakes, often leading to slower spring buildup and increased moisture problems inside the hive. Bees need morning sun to warm up and start foraging early, so a shaded location delays their activity and can encourage mold or mildew on frames. If your only available spot is shaded in the morning, consider trimming back tree branches or relocating the hive to a sunnier area before the colony grows too large to move easily.
Setting hives too close to patios, play areas, or walkways creates unnecessary conflict with family and neighbors. Bees establish flight paths within the first few days, and if those paths cross high-traffic zones, stings become more likely even with gentle bee breeds. A good rule is to keep hives at least fifteen feet from areas where people gather regularly, and use a tall fence or hedge to force the flight path upward. This small buffer makes coexistence much simpler and reduces complaints.
Installing hives in low-lying or flood-prone areas invites disaster during heavy rains. Water pooling around hive stands can wick up into bottom boards, soaking frames and chilling the cluster. Even a few inches of standing water stresses the colony and promotes disease. Always choose slightly elevated ground or build a raised platform, and confirm drainage works before placing your equipment.
Skipping local zoning and homeowner association checks is a mistake that can cost you the entire setup. Some municipalities restrict hive placement by distance from property lines, limit colony numbers, or require registration and inspections. A quick call to your city or county office and a review of any HOA covenants prevents conflicts and potential removal orders down the line. Taking ten minutes to confirm the rules now saves time, money, and neighborly goodwill later.
Final Takeaway
Choosing the best location for a new beehive in a suburban backyard comes down to balancing sunlight, drainage, neighbor safety, and access - not perfect conditions. Walk your yard at different times of day, observe where morning sun hits first, note where water pools after rain, and think about typical foot traffic patterns from both your household and neighbors. Use the checklist earlier in this guide to evaluate two or three candidate spots, then pick the one that checks the most boxes without requiring major property changes.
If your first choice turns out to have a drainage issue you missed or afternoon shade you didn't notice in early spring, small adjustments are simple: rotate the hive entrance, add gravel under the stand, or plant a low shrub to redirect foot traffic. Beekeeping rewards observation more than perfection, and your bees will adapt to a thoughtful location even if it isn't flawless. Trust what you see in your own yard, prioritize the factors that matter most for your situation, and remember that experience will sharpen your judgment for future hive placements.
Beehive Location Checklist
- Morning sun exposure, with afternoon shade in hot climates
- Protection from prevailing winds
- Level, well-drained ground (not a low spot)
- Elevated on a stand for airflow and moisture control
- Entrance faces away from high-traffic areas and property lines
- Flight path has a natural barrier (fence, hedge, or tall plants)
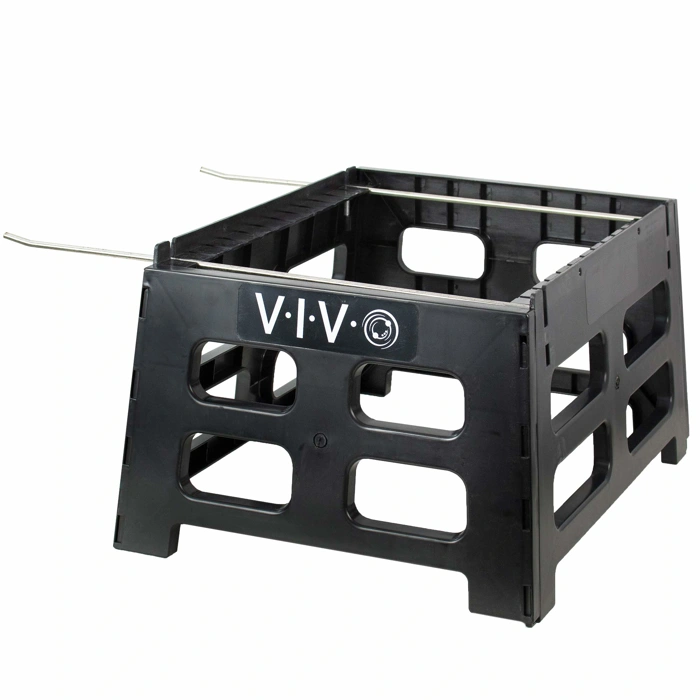
VIVO Black Plastic Beehive Stand for 10 Frame Langstroth Hives with Frame Holder, BEE-HVST
Elevation and airflow matter when setting up a new hive, especially on grass or uneven suburban ground. The VIVO Black Plastic Beehive Stand for 10 Frame Langstroth Hives (BEE-HVST) offers a lightweight, weather-resistant option designed to keep your hive off the ground and improve drainage around the base.
This stand is built from molded plastic and includes a frame holder, making it straightforward to position a standard 10-frame Langstroth hive. The plastic construction resists rot and moisture better than untreated wood, which can be helpful in areas with high humidity or seasonal rain. At $49.99, it sits in the affordable range for beginner beekeepers who want a durable stand without the weight or maintenance of metal or treated lumber.
The design provides clearance that helps reduce ground moisture contact and discourages pests such as ants or mice from climbing directly into the hive entrance. The stand's footprint is stable enough for placement on lawn, gravel, or packed soil, though shimming may still be needed if the ground is noticeably sloped. Because it's plastic, moving or repositioning the stand is easier than with heavier alternatives, which can be useful during initial site adjustments.
One tradeoff is that plastic stands may shift slightly under the combined weight of a full hive in windy conditions, so placing cinder blocks or stakes around the legs can add stability. The stand does not include leveling feet, so checking level during setup is important for frame alignment and comb-building consistency. The built-in frame holder is a practical addition for temporary frame placement during inspections, reducing the need for a separate holder tool.
If you're setting up your first hive on grass or uneven ground and prefer a stand that won't rust or decay, this plastic option balances cost, portability, and weather resistance. It's particularly suited for suburban beekeepers who need a simple, functional stand that requires minimal upkeep season to season.
- ✅ Lightweight and easy to move or reposition
- ✅ Weather-resistant plastic won't rot or rust
- ✅ Includes built-in frame holder for inspections
- ✅ Affordable at $49.99 for a 10-frame Langstroth stand
- ✅ Elevates hive for improved drainage and airflow
- ⚠️ May shift under full hive weight in windy conditions without anchoring
- ⚠️ No adjustable leveling feet for uneven surfaces
- ⚠️ Plastic construction less rigid than metal or hardwood alternatives
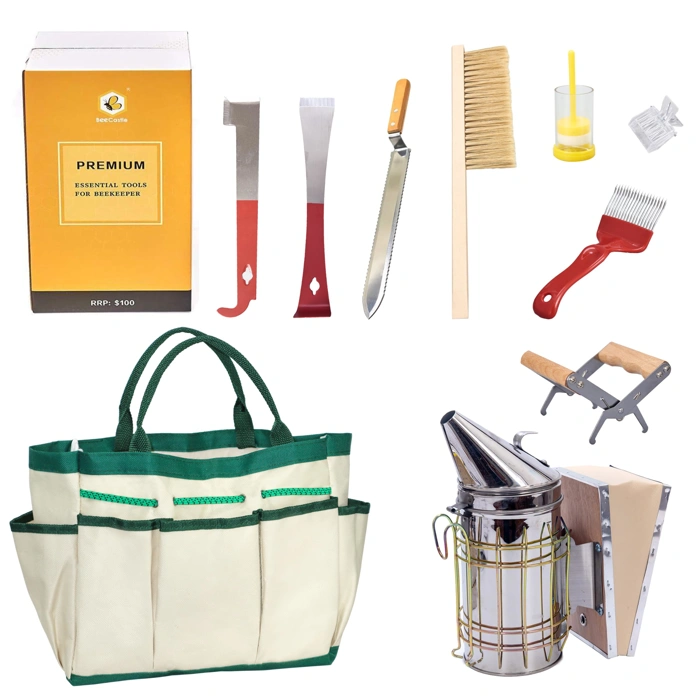
BeeCastle 9-Piece Beekeeping Tools Kit with Organizer Tote and Bee Smoker
Once you've selected the right spot for your hive, you'll need reliable tools to inspect frames, manage colonies, and handle routine maintenance safely. The BeeCastle 9-Piece Beekeeping Tools Kit with Organizer Tote and Bee Smoker is designed for beginner beekeepers who want a complete starter set without buying individual pieces separately.
This kit includes a bee smoker along with essential hand tools - hive tool, bee brush, and frame grip - all stored in a canvas organizer tote. The tote keeps everything in one place, which is especially useful in a suburban backyard where storage space may be limited and you want to minimize trips back and forth from your garage or shed. The smoker helps calm bees during inspections, making it easier to work confidently near neighbors and property lines.
At $26.99, the kit offers accessible entry-level pricing for new beekeepers who are setting up their first hive. Customer ratings average 4.6 out of 5, suggesting solid performance for routine hive checks and basic colony management. The portability of the organizer tote means you can carry all your tools to the hive site in one trip, then store them compactly when not in use - a practical advantage in smaller yards.
The kit focuses on core inspection and handling tasks rather than specialized equipment, so it suits beginners who are learning frame removal, comb inspection, and smoke application. It won't include protective gear or advanced extraction tools, but it covers the foundational items you'll reach for every time you open the hive. For suburban beekeepers who've finalized their hive placement and are ready to start hands-on management, this kit helps you maintain the colony with confidence and organization.
- ✅ Includes bee smoker and essential hand tools in one kit
- ✅ Organizer tote keeps tools portable and stored compactly
- ✅ Affordable entry-level pricing at $26.99
- ✅ 4.6 out of 5 customer rating
- ⚠️ Does not include protective gear or clothing
- ⚠️ Focused on basic inspection tasks, not advanced extraction
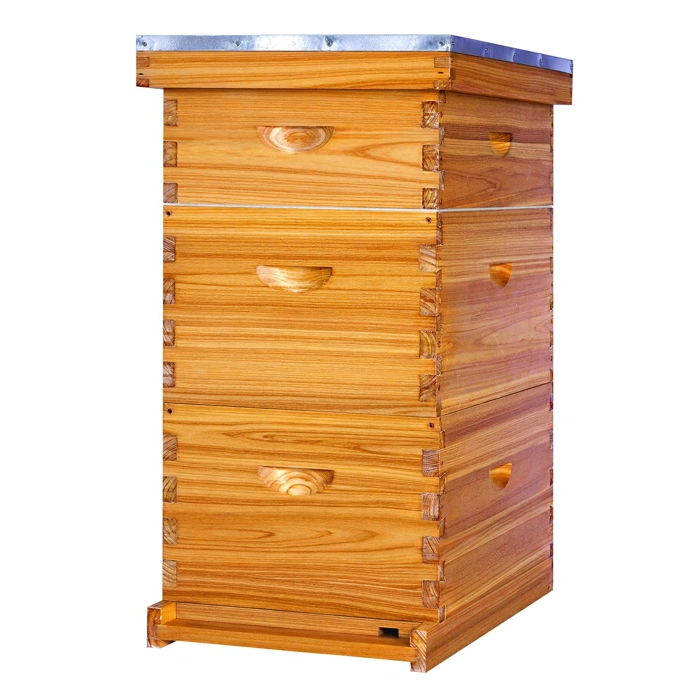
Honey Lake 8-Frame Langstroth Beeswax-Coated Beehive Starter Kit
The Honey Lake 8-Frame Langstroth Beeswax-Coated Beehive Starter Kit offers a compact alternative for suburban beekeepers working with limited yard space. This kit uses an 8-frame design instead of the standard multiple-frame configuration, reducing the hive's footprint and making individual components lighter and easier to handle during inspections. The beeswax coating on the woodenware provides weather resistance and a ready-to-use surface that helps the colony settle in more quickly than unfinished wood.
At $135.49, this starter kit is priced for beginners who want to avoid separate purchases of foundation, frames, and hive bodies. The 8-frame setup is particularly useful if your chosen hive location is near property lines or in tighter corners of the yard where a smaller footprint matters. The lighter weight of 8-frame boxes - compared to multiple-frame equivalents - also makes lifting and moving the hive more manageable when you need to adjust placement after the first season or perform routine maintenance.
The beeswax coating means the hive can be placed in its permanent location immediately after assembly, without waiting for paint or sealant to cure. This can be an advantage if you're installing a package or nuc during a narrow weather window in early spring. The Langstroth design remains compatible with standard beekeeping tools and expansion parts, so adding supers or replacing frames follows familiar procedures.
If your site evaluation revealed space constraints or if you prefer lighter equipment for easier handling, the 8-frame format is a practical choice. The trade-off is slightly reduced honey storage per box, which may require adding supers earlier in a strong flow, but the compact size and beginner-friendly coating make this kit well-suited to smaller suburban setups and first-time beekeepers seeking straightforward equipment.
- ✅ Compact 8-frame design reduces footprint for smaller yards
- ✅ Lighter boxes for easier lifting and handling during inspections
- ✅ Beeswax coating provides weather resistance and ready-to-use finish
- ✅ Beginner-friendly starter kit at $135.49
- ⚠️ Reduced honey storage per box compared to 10-frame hives
- ⚠️ May require adding supers earlier during strong nectar flows
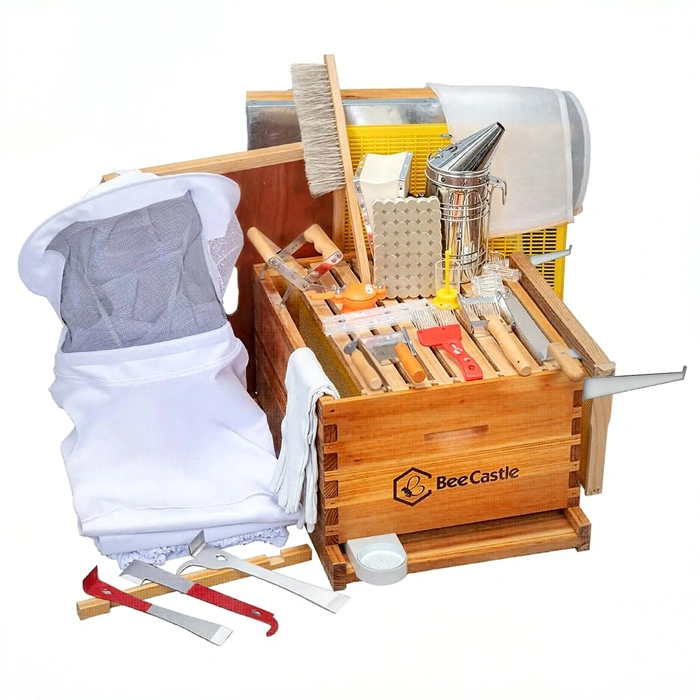
BeeCastle 10-Frame Beehive Starter Kit, Beeswax-Dipped, with Tool Set and Bee Suit
The BeeCastle 10-Frame Beehive Starter Kit bundles the hive body, beeswax-dipped frames, a basic tool set, and a bee suit into one package, making it a practical choice for beginners who have settled on their hive location and want to avoid shopping across multiple suppliers. The 10-frame Langstroth design fits standard equipment and provides enough space for a growing colony without overwhelming a first-time keeper.
Beeswax-dipped frames help the bees accept and draw comb more readily than untreated wood, and the included suit and tools - typically a smoker, hive tool, and brush - cover the essentials for inspections and basic maintenance. This kit does not include bees or a feeder, so you will need to source those separately once your hive is in place.
The hive components are unassembled pine, which keeps the price accessible but requires basic carpentry and exterior treatment if you want long-term weather resistance in a suburban backyard exposed to full sun and rain. The suit is sized generously but may not fit all body types comfortably, so check the sizing chart before purchasing.
At $144.49, this kit consolidates startup costs and reduces the decision fatigue that comes with piecing together a first hive setup. It is ideal for first-time beekeepers who have finalized their hive spot - balancing sunlight, drainage, and neighbor distance - and want everything in one purchase to begin the season with confidence.
- ✅ Includes hive, frames, tools, and suit in one package
- ✅ Beeswax-dipped frames encourage comb building
- ✅ 10-frame Langstroth design compatible with standard equipment
- ✅ Accessible price point for a complete starter bundle
- ⚠️ Hive components unassembled and require exterior treatment for durability
- ⚠️ Bee suit sizing may not fit all body types comfortably
- ⚠️ Does not include bees or feeder