This guide is for anyone who wants to grow fresh vegetables earlier in spring without spending hundreds on a greenhouse. A DIY cold frame is one of the simplest season extension projects you can tackle on your homestead.
Cold frames work by trapping solar heat during the day and protecting tender plants from frost at night. They're essentially miniature greenhouses built low to the ground. With one cold frame, you can start lettuce, spinach, and brassicas weeks before your last frost date.
The best part? You can build a basic cold frame in an afternoon using simple materials. No advanced carpentry skills required. This guide walks you through every step, from choosing materials to deciding what to plant first.
Essential Tools and Materials You'll Need
Gathering your materials before you start makes the build go smoothly. For the frame itself, you'll need untreated lumber: four pieces of 2x12 boards cut to your desired dimensions. A 3x3 foot frame is a good beginner size.
For the lid, you need a transparent cover. Old window sashes work perfectly if you have them. Otherwise, clear polycarbonate panels or corrugated plastic roofing are affordable alternatives. You'll also need exterior wood screws, two or three hinges, and a prop stick or chain to hold the lid open.
Tool-wise, keep it simple: a drill, saw, measuring tape, level, and screwdriver. For weatherproofing, grab exterior wood stain or paint and silicone caulk. Optional but helpful: corner braces for extra stability and a soil thermometer to monitor interior temperature.
Step-by-Step Guide: Building the Cold Frame Box
Start by cutting your lumber to create a sloped frame. The back wall should be taller than the front, typically 12 inches in back and 8 inches in front. This slope helps rainwater run off and maximizes sun exposure.
Lay out your four pieces in a rectangle on flat ground. Drill pilot holes at each corner to prevent wood splitting. Attach the corners with three-inch exterior screws, making sure everything sits square. Use a carpenter's square or measure diagonally from corner to corner—both measurements should match.
For extra stability, add corner braces on the inside. If your frame will sit directly on soil, you're done with the box. If you want it raised, attach a bottom frame or anchor it to a permanent raised bed. The box should feel solid when you give it a gentle shake.
Step-by-Step Guide: Assembling the Lid
Your lid needs to be lightweight enough to lift but sturdy enough to withstand wind and rain. If using an old window, you may only need to attach hinges directly. For polycarbonate or plastic panels, build a simple frame from 1x2 lumber first.
Cut the frame pieces to match your box dimensions. Assemble them into a rectangle and secure the clear panel with screws and washers to prevent cracking. Make sure screws aren't over-tightened. The panel should be held firmly but have slight flexibility.
Attach two or three hinges along the back edge of your cold frame box. Position the lid frame on top and screw the hinges into both the box and lid frame. Test the opening motion. The lid should lift easily and rest against the back when fully open. Sand any rough edges that might cause splinters.
Finishing Touches: Attaching Hardware and Weatherproofing
Ventilation control is critical for cold frame success. On warm spring days, interior temperatures can spike and cook your seedlings. Install a simple prop stick—a notched piece of wood that hooks under the lid edge to hold it at different heights.
For automatic ventilation, consider adding a temperature-sensitive vent opener. These solar-powered devices open and close the lid based on interior temperature without any effort on your part. They're especially useful if you're away during the day.
Weatherproof all wood surfaces with exterior stain, paint, or linseed oil. Pay special attention to end grain, which absorbs moisture quickly. Run a bead of silicone caulk along any gaps where water might seep in. Add a simple latch or hook to keep the lid closed during strong winds.
Tips for Siting and Using Your New Cold Frame
Location makes all the difference. Place your cold frame facing south in a spot that receives full sun from morning through afternoon. Avoid areas with heavy shade or where water pools after rain.
Position it near a water source if possible. Sheltering it against a building or fence on the north side provides extra wind protection and thermal mass. The structure will radiate stored heat at night, keeping your plants warmer.
Monitor interior temperature daily at first. On sunny days above 45°F outside, you'll likely need to vent. Open the lid several inches when interior temperature exceeds 75°F. Close it before late afternoon to trap warmth. Water in the morning so foliage dries before nightfall. Add row cover or old blankets over the lid on nights when temperatures drop below 25°F for extra protection.
What to Plant First for an Early Spring Harvest
Cold-hardy crops thrive in cold frames and can tolerate temperatures down to the mid-20s. Start with leafy greens like spinach, lettuce, arugula, and Asian greens. These grow quickly and can be harvested as baby greens in just three to four weeks.
Brassicas are excellent cold frame candidates. Try kale, chard, bok choy, and mustard greens. Radishes mature fast and tolerate crowding. Scallions and early carrots also do well. For flowers, pansies and snapdragons handle frost beautifully.
Plant seeds or transplants four to six weeks before your last expected frost date. Space plants slightly closer than garden spacing since they're protected. Succession plant every two weeks for continuous harvest. As weather warms in late spring, transition your cold frame to hardening off summer seedlings before transplanting them into the main garden.
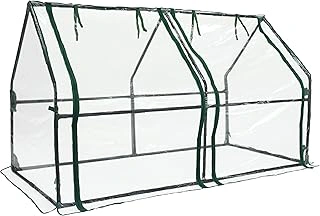
Gardzen Mini Greenhouse Portable Cold Frame
If building from scratch feels overwhelming, this portable cold frame offers a ready-made alternative. It provides instant season extension without cutting a single board.
The lightweight design makes it easy to move around your garden as your planting plan changes. The transparent cover protects seedlings from frost while allowing sunlight through. At $45.99, it's an accessible option for renters or those with limited DIY time.
This works well for gardeners who want to test cold frame gardening before committing to a permanent structure. It's also handy as a supplemental unit if your DIY frame fills up quickly. Just be aware that portable units typically have less thermal mass than ground-level wooden frames, so they may need extra insulation on very cold nights.
- ✅ No construction required, ready to use immediately
- ✅ Portable design allows flexible garden placement
- ✅ Affordable entry point for cold frame gardening
- ⚠️ Less thermal mass than permanent wooden frames
- ⚠️ May require additional weight or anchoring in wind
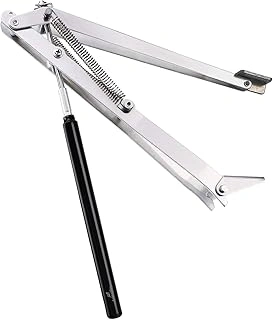
A ANLEOLIFE Automatic Solar Greenhouse Vent Opener with Dual Spring, 30lbs
Temperature management can make or break your cold frame success. This automatic vent opener eliminates the daily chore of monitoring and adjusting your lid.
The solar-powered mechanism expands when temperatures rise and contracts when they drop, automatically opening and closing your cold frame lid. No electricity or batteries required. The dual spring system handles lids up to 30 pounds, suitable for most DIY cold frames.
Installation is straightforward with included mounting hardware. Once set up, it responds to temperature changes throughout the day without any input from you. This is especially valuable if you work away from home and can't check on your cold frame during afternoon temperature spikes. At $32.85, it's a worthwhile investment for protecting your seedlings from heat stress.
- ✅ Automatic temperature regulation without power
- ✅ Prevents overheating when you're away
- ✅ Handles most DIY cold frame lid weights
- ⚠️ Requires proper installation for optimal function
- ⚠️ May need adjustment based on your climate
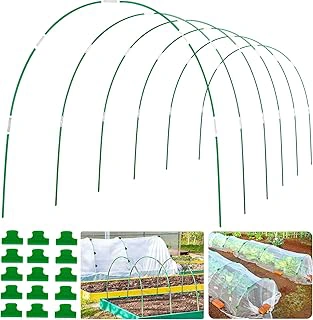
Greenhouse Hoops Grow Tunnel 8FT Long Fiberglass Garden Hoops Frame
Row covers and hoop tunnels complement cold frames beautifully for extended season coverage. These fiberglass hoops create an 8-foot-long growing tunnel when covered with plastic or row cover fabric.
Use them to protect longer rows of crops that won't fit in your cold frame. The flexible fiberglass material bends easily to create the tunnel shape and springs back into position. They're more durable than PVC and resist cracking in cold weather.
Install these over in-ground beds or raised beds for frost protection. They're excellent for covering larger plantings of greens, root vegetables, or early peas. At $21.99, they're an economical way to expand your season extension setup beyond what one cold frame can accommodate. Pair them with greenhouse plastic or floating row cover based on your protection needs.
- ✅ Extends season protection to longer garden rows
- ✅ Fiberglass resists cold weather cracking
- ✅ Affordable way to protect more growing space
- ⚠️ Requires separate covering material
- ⚠️ Not as enclosed as a solid cold frame
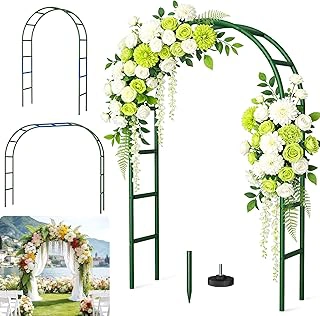
Fecita Thickened Rustproof Metal Garden Arch Trellis for Plants and Weddings
While primarily designed as a decorative trellis, this metal arch serves double duty in the season extension garden. Use it as a framework for draping row cover or plastic sheeting over early plantings.
The rustproof metal construction withstands weather exposure without deteriorating. It's sturdier than temporary hoops and can remain in place year-round. The arch design creates headroom for taller crops like peas or early beans.
Install it over a garden path with beds on either side, then drape clear plastic or frost fabric over the frame during cold snaps. Remove the covering when weather warms for easy access. The trellis structure remains useful throughout summer for vining crops. At $42.99, it's more expensive than simple hoops but offers versatility beyond basic season extension.
- ✅ Durable metal construction lasts for years
- ✅ Multi-season use as protection frame and summer trellis
- ✅ Creates walk-through height for better garden access
- ⚠️ Higher price point than basic hoop frames
- ⚠️ Requires covering material for frost protection